Wednesday, October 27, 2010

Second Helping: Apple Pomegranate Salad with Tarragon Dressing

101015_CPE_apple salad4_web

If you're unfamiliar with pomegranates, prepare to fall in love. They have a reputation for being hard to eat, but that's nonsense. Simply score the leathery outer skin, peel it open, and gently remove the gorgeous red arils from the bitter membrane. You can do this over a bowl or by immersing the fruit in water, which helps separate the membrane bits. (For a great pictorial of this method, check out this post at Wit & Whistle.)

101016_CPE_apple salad7_webSome people chew the arils and spit out the seeds, but I don't. I like the crunch, and spitting out those tiny seeds takes a lot of the fun out of the experience.

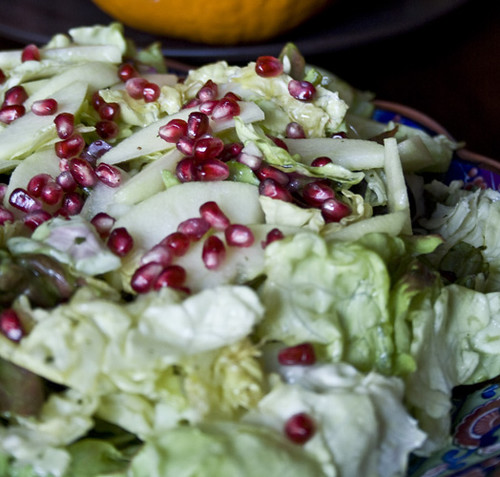
This fall salad came together at the farmer's market, where I find more affordable organic produce. Organic apples at $2 a pound, a head of organic red butter lettuce, a beautiful deal on pomegranates (three for $1!), tarragon from my garden -- and this salad was had for a song.

The dressing worked a miracle in my house. My older son, who has never eaten lettuce, happily ate three servings of greens. We used the dressing to season purple cauliflower for roasting the next day -- yum!

Tip: If the high price of organic food puts you off, check out the Environmental Working Group's Shopper's Guide to Pesticides. Available as a pdf or iPhone app, it identifies the "cleanest" produce and the "dirty dozen" to help you choose when to go organic.

Apple and Pomegranate Salad with Tarragon Dressing

101015_CPE_apple salad1_web
Soaking the apple slices in acidulated water -- with lemon juice or vitamin C -- keeps them from browning. Leftover dressing will keep at least a week or two in the refrigerator.

2 to 3 apples, peeled, cored and sliced
2 vitamin C tablets, crushed, or 1 to 2 tablespoons lemon juice
1 head of butter lettuce or other greens
3 tablespoons pomegranate arils

Tarragon Dressing:

1/3 cup apple cider vinegar
2/3 cup olive oil
2 tablespoons honey
1 tablespoon fresh tarragon, chopped
salt and pepper to taste

In a small bowl, stir together crushed vitamin C tablets or lemon juice with water. Peel, core, and slice apples, then immerse slices in water bath for a few minutes to reduce browning. Drain.

Combine the dressing ingredients in a jar and shake to blend. Combine greens and apples in a large bowl; drizzle dressing over and toss to combine. Top salad with pomegranate arils.

Monday, October 25, 2010

The Kids Cook Monday: Smokey Dill and Cheese Muffins

My grandma always insisted that soup was the best thing on Earth. The way she found to convince me to eat all contents from that huge white porcelain bowl was to bring something delicious as a side: Sometimes it was just plain fresh roll from her favorite bakery to be covered with butter. Other times one of her creative appetizers was there, something like stuffed cheese and ham filled potatoes.
So, for today's part of the campaign The Kids Cook Monday, here's one more way to enjoy the arrival of rainy days,and give hearty stews and soups a good company: a delicious savory muffin. The delicate dill touch enhances the smokey touch from the turkey ham. When the mix of cheeses melts inside, it create a unique texture to this impossible-to-stop-eating muffing.


Smokey Dill and Cheese Muffin
If inspired to have kids helping you, the opportunity is fantastic. They can help measuring and mixing and also chopping ham. One popular activity with the 3 years old kids is to spray the muffin pan or cups with oil.

1 cup turkey smoked ham, chopped
2 cups unbleached all -purpose flour
1 tablespoon sugar
2 teaspoons baking powder
1 teaspoon salt
1 1/2 teaspoons garlic powder
4 teaspoons dill
1/2 cup Parmesan cheese
1 cup lite cheddar and jack cheeses, shredded
1 egg
1/2 cup nonfat milk
1/2 cup non fat yogurt
1/2 cup canola oil

Pre-heat oven to 400 F. Stir fry smoked ham in a hot skillet and set aside. Mix all dry ingredients in a bowl. In another bowl whisk egg with milk, yogurt and oil.  Pour the wet mix into the dry bowl gradually. Add ham, and mix the batter slowly. Bake in a greased muffin pan (or muffin cups) for about 25 minutes. Yields 12 muffins.

Friday, October 22, 2010

And the winner is...

Thanks for all the well wishes on our anniversary! We hope you're enjoying the Halloween treats in Spook Play Explore, along with the scores of recipes we've shared here in the past year.

The lucky winner of the Amazon gift card, according to the random number generator, is ... Alora! Congratulations, Alora -- we'll e-mail you to make arrangements.

(By the way, to those of you who have trouble posting comments: Thanks for your patience. I've been trying to identify what the trouble. We're not the only ones on Blogger with that problem, but the solution remains elusive. I haven't given up yet, though!)

Wednesday, October 20, 2010

Lunch Box Pumpkins, plus Giveaway Closing!

101020_CPE_minijackPlanning a Halloween party menu, I was looking at friend's setting of Halloween snacks with a clementine "pumpkin" on the side.

A light bulb flashed.

I got out my Sharpie, and in seconds turned two clementines into jack o'lanterns, just the right size to tuck into the day's lunch boxes. If you aren't afraid to arm children with permanent marker, a bowl of clementines and some Sharpies could make for an easy party activity.

For more fun Halloween ideas, take a look at our collection of treats, Spook Play Explore, available as a free download. Today's your last chance to enter to win a $25 Amazon gift card! Leave a comment on our anniversary post from last week before midnight PST for your chance.

Monday, October 18, 2010

The Kids Cook Monday: Monster Treats

100903_CPE_monster treats_1We had almost as much fun coming up with silly descriptions for these as we did making these fun nibbles for The Kids Cook Monday -- part of the Healthy Monday campaign. They're one of the creepy treats featured in our free e-booklet, Spook Play Explore. If you haven't snagged your copy, click here or the link to the right to get your free copy. And don't forget to enter our Amazon gift card giveaway before Wednesday!

Monster Treats gave my son the most leeway in sharing them with friends: They could be special treats for monsters, or special treats made out of mashed-up monsters. (The peas, of course, are monster boogers.)

Nondescript on the outside, these treats break open to reveal vibrant purple and brilliant green. For an even more colorful presentation, pair these with a batch of Sweet Potato Nuggets.

100903_CPE_monster treats_small

Monster Treats

We liked the combination of bright green peas with deep purple potatoes, but you can mix in almost anything you like. You can use leftover mashed potatoes to speed up prep time.

100903_CPE_monster treats_4
2 pounds purple potatoes, peeled and cooked
2 teaspoons butter
salt and pepper to taste
1 to 2 cups frozen peas
2 egg whites
1 1/2 cups bread crumbs (I mix regular bread crumbs with panko)

Combine potatoes, butter, salt and pepper in a large bowl and mash with a fork or masher. Stir in peas. Refrigerate until well chilled.

Put egg whites in a shallow bowl and stir briefly with a fork or small whisk. Put bread crumbs in another shallow bowl.

To form treats, scoop up a tablespoon or so of the potato mixture and shape into a nugget or ball. Dip into egg white and then into bread crumbs.

To freeze: Arrange nuggets on a plate or pan and set in the freezer for a few hours. Store frozen nuggets in a sealed freezer bag; take them straight out of the bag to bake.

To bake in the oven (my preferred method): Preheat oven to 400 degrees. Set nuggets on a parchment-lined baking sheet and spray lightly with olive oil or cooking spray. Bake for 20 minutes or until nuggets are lightly browned and crispy.

To pan-fry: Lightly spray a non-stick pan with olive oil or cooking spray. Cook nuggets over medium heat for a few minutes on each side until lightly browned and crispy. (You can also fry them in oil.)

Friday, October 15, 2010

Playdate Special: Little Monsters Homemade Granola Bars

The boys measured all irresistible and delicious ingredients. They grated nuts and dried fruits, chose the granola mix,  and blended it all. Finally they ate the final result in the same playdate! Weeks before  they also designed the labels of their "Little Monsters" brand and could share the bars during a awesome camping trip with friends to Portola Redwoods Park.
Hooray - one day those delicious home made bars will be my treat to kids at Halloween.
But before I get to excited about this idea - and delirious-, about this possibility - let me share something else with you. This is the first recipe to celebrate the beginning of our second year online.
If you didn't have time yet to celebrate with us, don't forget to leave a comment at our anniversary post- you can be the lucky winner of a U$ 25 Amazon Card. Also, as a "goodie-bag" we are sharing a free e-booklet Spook Play Explore on the upper right of the screen. You just download it and have a collection of healthy soups and yummylicious treats.


Little Monsters Granola Bars

Adapted from Mark Bitman's Apricot Almond Granola Bars

1/2 cup almond butter
1/2 cup honey
1 teaspoon vanilla extract
1 cup crispy brown rice cereal
1 cup your favorite granola mix
1 cup your favorite nuts and dried fruits mix (we used macadamia, cranberries, pineapple, almonds and cashew)
1/4 teaspoon salt
Canola oil for greasing
½ tsp cinnamon
2 tablespoons fine unsweetened dried coconut 

Invite the kids to measure and mix the dry portion of the bars: crispy rice cereal, granola, mix of fruits and nuts, salt, cinnamon and coconut. In our playdate,  we used a Progress nut chopper to grind nuts and fruits, which was a great challenge for them. Brush a baking dish or cookie sheet with oil and line it with plastic wrap. Melt almond butter, honey and vanilla in a saucer over medium heat for long enough to have all ingredients mixed into a paste, stirring it all with the help of a wood spoon or whisker. Add the wet paste to the dried ingredients and stir. Spread the granola mix evenly with the help of a spatula, and cover it. Refrigerate for at least one hour or more to achieve the ideal texture. Once ready, the bars will look like the ones from the packages. Remove the plastic film and cut the bars into any length and shape you like.

Wednesday, October 13, 2010

Anniversary presents -- for you!

We are thrilled to be celebrating our one-year anniversary this month! We're so excited, in fact, we're offering two giveaways this week.

Everyone's a winner in the first: We've compiled 10 of our favorite recipes for Halloween celebrations in a free e-booklet, yours for the taking!

This free collection -- Spook Play Explore -- includes a few special treats that aren't yet available on the site, such as the Ghosts and Creepy Crawlers Coconut Treats pictured here. Click here to get your copy, or click the link to the right.

Our second giveaway is a $25 Amazon gift card. To enter, please leave a comment on this post by midnight next Wednesday, Oct. 20. (We know some folks have had trouble submitting comments; if that's the case for you, please click here to send us an e-mail.) We'll randomly draw a number and announce the winner over the weekend.

Thank you all for your support and encouragement! We've surprised ourselves: The Cook Play Explore recipe box is bursting with original recipes (172 and counting), and more than 1,000 wonderful people have subscribed to the blog. Thank you for joining us on this adventure.

We hope you enjoy Spook Play Explore, and don't forget to leave a comment for your chance at an Amazon gift card!

Wednesday, October 6, 2010

Make It With Milk: Mascarpone

100918_CPE_mascarponeWe've made yogurt, and we've made butter. Don't you think it's time for a treat? The latest in our occasional series on cool stuff you can make with milk is decadent mascarpone.

Fresh, rich mascarpone is best known in tiramisu, but it's beautiful in all sorts of sweet and savory dishes. It's a rich finish for a homemade pasta sauce, a heavenly companion to fresh fruit, a willing partner to stronger cheeses for a delicious spread. You can use it to make our Hands-On Gnocchi or Popeye Sauce ... or eat it straight with a spoon. Or your fingers. We enjoyed it in strawberry-topped crepes, then in strawberry-mascarpone parfaits.

My older son swooned over it; the younger one wouldn't even try it, but he doesn't like whipped cream either. (I hope he'll outgrow the condition.)

This is deliciously simple, perhaps 15 minutes total hands-on time. But it does take time for the magic to work -- up to 24 hours. Tartaric acid may be hard to find, but if you love mascarpone, it's worth tracking down (try online shops, brewing shops, or earthy-crunchy stores). You'll have plenty left over to make this again and again and again.

Mascarpone

100917_rootbeer_12
This yielded just over 9 ounces of mascarpone. Tartaric acid is available at beer- and wine-making supply shops, and online (try the New England Cheesemaking Supply Company). It is not the same as cream of tartar! Also, avoid using ultra-pasteurized milk products here. Pasteurized is fine; ultra won't work well. This is drawn from several recipes floating around the Interwebs, but relies most heavily on Fankhauser's Cheese Page.

1 pint half-and-half
1 pint heavy cream
1/4 teaspoon tartaric acid (see Note)

Combine half-and-half and cream in a pot and heat to 180 to 185 degrees. Dissolve the tartaric acid in a tablespoon of water, then stir into the heated cream mixturey. Keep the cream at 180 to 185 degrees for 5 minutes, stirring occasionally. It should start thickening a bit.

Put the cream in the refrigerator in a covered container (I keep it in the pot) and let it cool thoroughly (I leave it about 12 hours).

Line a fine-mesh strainer with clean muslin, cheesecloth, or a coffee filter and set it over a bowl. Pour the thickened cream into the strainer, cover, and let it sit in the refrigerator for at least 12 hours until the mascarpone thickens to the consistency you want. Store the finished mascarpone in a covered container and use soon. Some people say you need to eat it in a day or two; others say a week. Use your judgment.

Monday, October 4, 2010

Kids Cook Monday: Beef, Spinach and Mushroom Pockets


This recipe has a very specific inspiration: the Syrian-Lebanese sfihas served in Rio de Janeiro. Traditionally in their original source, they are made with ground lamb, but the popularity of those delicious morsels - as easy to prepare as to eat -  was so big that after crossing oceans and generations they ended up being adapted and now have all different fillings.  They may be stuffed with ground beef, green collards, and even some kind of ricotta cheese. Sfihas might be also found with different types of dough and shapes. But the one I can't forget was a perfect triangle, and each bite of it made my mouth be full of water .
That said, I can now indulge on something else. As a recipe that is beyond an adaptation. A free-short-cut and free-style interpretation of sfihas. And a very easy one, so that I could invite the kids to cook with me. Kids helped to roll and cut the dough and even wrap their beef in diverse shapes. The result was delicious. And the now are asking me if this is going to be a regular Monday dinner!

Spinach and Mushrooms Beef Pockets
Those can be prepared ahead time and par-baked. I followed the instructions for my favorite whole wheat pizza dough sold at TJ - about 10 minutes at 450 F, and you can leave a bit less to end baking later or the next day. A possible vegetarian/vegan alternative for this recipe is to work with firm tofu instead of beef. 

1 tablespoon extra-virgin olive oil, and plus to garnish and spray on the top
1 pound ground beef (15% fat maximum is great, I used grass-fed organic ground beef)
Kosher salt
1 cup finely sliced crimini mushrooms or baby Portabella
1 cup spinach, chopped (fresh or frozen)
1 teaspoon ground allspice
1 package of fresh pizza dough
More olive oil, to be sprayed with a mister
Z'aatar (more about it here)  or sesame seeds to be sprinkled on the top


Start up with the filling: Heat olive oil in a pot. With high heat on, add beef and fry it up to when it is almost totally cooked. Turn heat to medium, adding mushrooms and spinach. When all is cooked (mushrooms still al dente) get rid of the liquid collected on the bottom of the pot. Add allspice. Simmer for about 15 minutes, stirring to get all juices in the mix.
In the meantime, turn the oven to 450 F. Sprinkle a baking sheet with some whole wheat flour or corn flour and spray a thin layer of olive oil over it. Roll the dough and cut all shapes that kids (or you) like. Transfer the dough pieces to the baking sheet. With the help on one spoon, put beef filling over pieces of dough, and close the parcels as you like. You mary roll, wrap the contents on a rectangle or triangle shape or just in a pocket style. You can invite kids to both of those parts of the process. Spray olive oil and sprinkle za'atar or sesame seeds on the top of each morsel. Add some couple more minutes to the time recommended by the dough package or your recipe if you are using home made dough. Garnish with a stream of olive oil around the pocket and some more spices if you love them. Enjoy while it is still hot. 

LinkWithin

Related Posts Plugin for WordPress, Blogger...