Monday, November 29, 2010

Kids Cook Monday: Jewel Salad

101116_jeweled salad_2

I'm in love with this seasonal fruit salad, a happy accident that came together on a day when nothing else was going smoothly.

We had leftover brownies and pumpkin bread on hand, but not much more. I was barely able to clear off a table before the playdate -- I hadn't put any thought into making something new.

Fresh fruit to the rescue. I sliced up persimmons and apples, pulled apart a pomegranate, and chopped up some dates. The dressing came together quickly, and Anna suggested the perfect finishing touch: a dash of cinnamon and a bit of fresh basil.

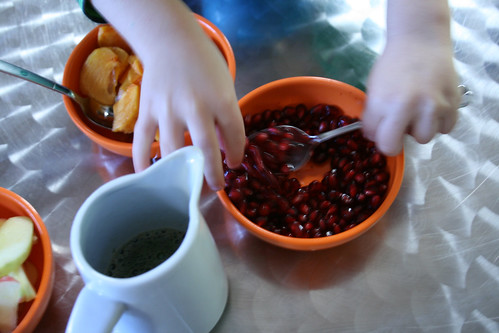
I invited the kids to make their own salads. They sampled freely, lighting up with surprise when they tasted something they liked ... and wrinkling their noses when they nibbled something less appealing. In the end, each enjoyed a personalized dish of late autumn's best. A healthy, perfect little something for The Kids Cook Monday!

If you're crazy for persimmons, try Persimmon Compote, which is delicious stirred into yogurt or oatmeal or spooned over ice cream. We also have Persimmon and Fennel Salad, a crunchy and colorful salad with greens.
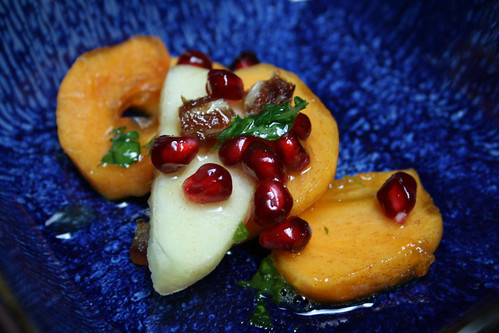
101116_jeweled salad_4

Jewel Salad

Pears are a nice substitute for the apples. For tips on using fresh pomegranate, check out this post.

arils from 1/2 a pomegranate
2-3 Fuyu persimmons, peeled and sliced
2 apples, cored, peeled, and sliced
4 dates, pitted and chopped
juice of 1/2 a lemon
water
Dressing:
juice of 1/2 a large orange (about 2 ounces)
2 tablespoons cider vinegar
1 tablespoons honey
1/8 teaspoon cinnamon
1 teaspoon chopped fresh basil (optional)

Combine the lemon juice and two cups of water in a small bowl. Add the apple slices and let sit for 10 minutes (this helps prevent browning), then rinse and drain well.

Set out apple slices, persimmon slices, pomegranate, and dates in separate bowls.
In a small bowl, combine dressing ingredients and whisk until blended. Pour dressing into a cream pitcher or measuring cup to make it easy to pour.

Children can spoon fruit into their bowls and pour dressing over it.

If you're making this without the help of little hands, just combine all the fruit in a large bowl, add dressing to taste, and stir to combine.

101116_jeweled salad_3

Wednesday, November 17, 2010

Second Helping: Maple-Vanilla Sauteed Apples

101102_CPE apples_6

Sauteed apples have great versatility for such a simple comfort food. Quick to prepare and satisfying, they're a mouthwatering match for savory roasted meats, and just as good spooned over pastry or ice cream.

The kids devoured this as an after-school snack. I served it with citrus cardamom popovers, one of our family favorites. The popovers lacked pop -- I was so distracted chatting with Anna that I absentmindedly opened the oven to check on the popovers, a sure way to end up with deflated puffs. But they still tasted good, and no one seemed to mind. They disappeared rapidly, along with these apples.

101102_CPE apples_1


Maple-Vanilla Sauteed Apples

These are delicious alone, and wonderful paired with ice cream, yogurt, popovers, waffles, or oatmeal.

1 tablespoon coconut oil or 2-3 tablespoons butter
4 apples, peeled, cored, and sliced
1 tablespoon maple syrup
1/2 vanilla bean, split lengthwise and scraped, or a splash of vanilla extract
pinch of cardamom (optional)

Melt coconut oil or butter in a large skillet over medium heat. Add apples and saute 5 to 10 minutes. Add maple syrup, vanilla, and cardamom and cook a few minutes more.

Monday, November 15, 2010

Kids Cook Monday: Tapioca Flour Cheese Popovers

We all love popovers here and can't wait to see them again every Autumn. Darienne's recipe is a great one, and watching her to prepare a batch for a playdate, I just realized how similar the Brazilian "pão de queijo de liquidificador" (cheese puffs made in a blender) is to the American Thanksgiving staple. Inspired by this similarity and the possibility of having an alternative recipe for the friends who are gluten intolerant, I prepared one batch of it for our last snack playdate.
Like wheat flour popovers, those have also a life of their own, and have to be in the oven up to when ready - anxiety is not a friend of those, and opening the oven is sort of ultimate sin. A change on the Brazilian classic is the method: I grew up believing that you would need a blender to prepare it. But now I know that this is not necessary. A good whisk will do the job as well as the electric gadget.
So, if you want to try something very different but still very in tune with the coming holiday you might enjoy this. Kids loved it and approved it.  They were invited to prepare it with us but chose to play instead. But if you want to insist on their participation, they can break eggs, whisk, measure and have fun.

Tapioca Flour Cheese Popovers

I sometimes buy the tapioca flour (or starch) at Asian markets. Lately I tried a wonderful organic one from Amazon, imported from Brazil. A bit pricey, but with perfect results.

2 cups tapioca flour
1 cup grated Parmesan or Pecorino cheese
Kosher salt to taste
2 eggs
1 cup fat free milk
1/2 cup canola oil
Dried rosemary  to sprinkle on the top


Pre-heat oven to 380 F. Grease with oil or oil spray aluminum muffin cups. Combine dry ingredients and set aside. In a bowl beat eggs, and gradually add oil and finally milk. Pour liquid over flour, whisking constantly. When everything is well mixed - and it will be incredibly liquid - pour on baking cups. Bake for around 30 minutes or when the tops is getting golden. Enjoy and Happy Thanksgiving!

Monday, November 8, 2010

The Kids Cook Monday: Pumpkin Tostadas with Black Beans

The kids did help make this Kids Cook Monday recipe -- but they didn’t eat much of it. They suspiciously eyed the bowl of pumpkin salsa and beans, and all but one bypassed it completely in favor of plain cheese-topped tostadas, one adorned with a pumpkin-seed happy face.

Yet the adults liked it, it was easy, and I know that somewhere out there is a child who likes salsa. So I’m sharing it with you today.

I threw this together for an after school snack during a hectic week. I really worked hard on it: I opened two cans, one jar, and a bag of shredded cheese. Feel free to roast a pumpkin yourself, chop up fresh salsa, cook the beans from scratch, and make your own tortillas. I’ll watch from here.

Oh, I confess: I offered raw pepitas and fried some sage leaves to fancy it up. I couldn’t keep it that simple.


Pumpkin Tostadas with Black Beans

This is an easy way to use up leftover bits of canned pumpkin. It makes enough to serve 8, with some leftover salsa.

8 tortillas, whole-wheat or corn
olive or canola oil
1/2 cup salsa (I used Trader Joe's Double Roasted Salsa)
1/2 cup canned pumpkin puree
1 can black beans, rinsed and drained
shredded Mexican cheese blend
raw pepitas (optional)
fried sage leaves (optional; see recipe below)

Preheat oven to 400 degrees. Brush both sides of tortillas with oil (or spray well with oil) and arrange in a single layer on baking sheets. Bake for 5 minutes, then turn tortillas over and bake another 3-7 minutes or until crispy. Remove from oven and let cool.

In a large bowl, have kids combine salsa and pumpkin puree, stirring until blended. Set out the pumpkin salsa, the beans, cheese, pepitas and sage.

Set a crisped tortilla before each child. With a spoon, they can spread salsa over the tortilla, then help themselves to whatever other toppings they want.

Return the topped tortillas to the oven and bake until the cheese melts.

Fried Sage Leaves

fresh whole sage leaves
olive oil
salt

Wash sage leaves and dry well, blotting with a paper towel. Heat olive oil in a small skillet. Drop a few sage leaves in at a time and watch them carefully: They should turn a deep pine green and crisp in under 30 seconds. Don’t let them brown! Remove them with tongs and set on a plate lined with paper towels to drain and cool. Sprinkle with salt to taste.

Save the leftover sage-infused olive oil for cooking or dressings.

Thursday, November 4, 2010

Playdate Special: Homemade Hummus

Sometimes they just want to play. And the "cook" and "explore" part of the deal is just not so convenient for "that" energetic time of the day. That seemed to be the case with our afternoon-snack playdate on a sunny afternoon before Halloween. The original plan was good: I wrote down a easy recipe in a very readable 18 font size, so that the 6-year-old boys could read it loud. I gathered all measurement cups and took my lovely mini-food-processor from the cupboard. But nothing in this world was good enough to stop them. So, they played.

In the meantime, Darienne and I had fun watching the fresh garbanzo beans turn into a paste. We gradually added all ingredients in the noisiest food processor ever, and tasted it up to the point when we felt that hummus was ready to be served.

And for our pleasure, the kids came back hungry and curious enough to try this very tasty homemade treat, very different from the ones we buy from the store. Hummus was tasted with toasted mini-ptta bread, slices of cucumber, baby carrots and the seasonal Boo chips. There we had the "explore" part of the mission. To add fun to the story, they built up a very improvised clubhouse in the backyard made of cardboard and a clothes dryer.  In their little imaginative play, the al fresco restaurant was just the ideal place to have their snack. And for us, the moms, preparing the snack was again a playful time to catch up.

Little Monsters Homemade Hummus

I used freshly cooked garbanzo beans. If you are in the mood to try that, just follow the package instructions. I added garlic, olive oil, and salt to the water, and as always, soaked the beans overnight. I truly believe it's possible to have very good results with canned beans. And as Darienne suggested, adding a bit of bell peppers is a great touch to the hummus.

1 1/4 cups cooked garbanzo beans, drained
1 teaspoon garlic powder
1 tablespoon olive oil
3 teaspoons lime juice
Kosher or sea salt to taste
1 tablespoon tahini
Water to thin the mix (if using freshly cooked beans, use water from the pot)
Paprika or zaatar to garnish

Start processing the beans on medium speed. Add gradually the garlic, olive oil, lime juice, salt and tahini and process for enough time to have all ingredients very well mixed. Start to add drops of water up to the point you feel that the mix is smooth enough to be used as a spread or dip. Enjoy!

LinkWithin

Related Posts Plugin for WordPress, Blogger...