Sunday, January 31, 2010

Second Helping: Rockfish en Papillote

It is such a charming dish that even people who are not really into fish will probably give it a try. Last time I had something that came wrapped in a parcel was a long time ago.  Kids were not there, not even in my dreams. Fish was covered with shrimps and exotic veggies inside a folded banana leaf. A wonderful buttery sauce was all over the packet and dinner was at one of the restaurants of Búzios, in the southeast coast of Brazil.
Here, far away from the tropics, I was somehow reminded of that picture after buying some Beyond Green unbleached parchment paper.
Fish was already in the fridge, vegetables were there, and parcels were prepared for a quick Thursday dinner. Fascinated by the presentation, kids ate most of it. Now it will be an option for Valentine's dinner, when parcels will have even a more flavorful fish, such as Halibut. And the tropics will be here.

Pacific Rockfish en Papillote

Any white meat fish will do well for this recipe, as far as it is one chosen from the list available online from Seafood Watch. I always carry my pocket guide everywhere so not to be doubtful of what to do when shopping.

1 medium zucchini, thinly sliced
4 fingerling potatoes, thinly sliced
4 rockfish fillets
4 slices portabella mushroom
1/4 tomato, cut in halves
Spring onion, cut in long sticks
Kosher or sea salt to taste
Freshly ground black pepper to taste
Olive oil to drizzle over layers
Preheat oven to 400 F.  Cut parchment paper in 4 equal parts, enough to wrap the fish towers. Layer 6 circles of zucchini on the bottom, topped with 4 slices of potatoes, and then fish. Finish with slice of portabella, tomato half-moon, and spring onion. Season each layer with a bit of salt and pepper and drizzle olive oil. Fold and close parcels loosely. Bake for 15- 20  minutes, depending on how you like your fish done.

Wednesday, January 27, 2010

Dressed Up Mac & Cheese

[IMGP2840-743421.JPG]

This is really a very short story that repeats itself almost every week.

We are about to run out of everything in the fridge and pantry. Kids are hungry and running around the kitchen looking for snacks. Meal planning didn't go so well during these constant rainy days and improvisation is needed.

Here's an emergency exit to avoid a visit to the drive-through. It was an instant success for the kids — with second helpings and nothing left in the bowls.

Mac and Cheese with Black Forest Ham and Zucchini

This time it was zucchini, but sometimes I use other greens to add nutrition to mac and cheese, like tiny bits of broccoli florets. Smoked turkey ham is also a great option.

2 individual packets Organic Microwave Mac'n Cheese (Trader Joe's or Annie's) prepared as instructed (or, if you're inspired and have time, go for a traditional recipe of mac and cheese) plus 1/4 cup of water
3 teaspoons olive oil
4 slices Black Forest ham, cut in squares
1 medium zucchini, thinly sliced
1 tablespoon grated Parmesan style cheese

Stir-fry ham and zucchini in olive oil. Mix with prepared mac and cheese and stir well. Add grated cheese and wait to melt. Let it stand for 5 minutes and serve.

Friday, January 22, 2010

Second helping: Leftovers, please!

Sometimes there's too much food for not so many people on the table. Freezing? Tossing away? No.  I always want to use it all. And the idea is simple: to transform yesterday's food in today's new adventure.

One way I found out to make this process into a very attractive challenge is to visit the fridge on the day after and select all kinds of very fresh ingredients and some herbs and spices.
When very creative,  all I want is to re-dress the old into a brand new flavor. That can be achieved by using the odd ingredients: capers forgotten somewhere in the fridge, unknown spices given by someone and now in the corner of the pantry.  I display the ingredients on the counter top and start to imagine how they could all go together.

Sometimes I go to my favorite reference book and browse for inspirational ideas that would help me to create a new recipe, and that can be very rewarding.

Here are a few recipes that can use left overs as ingredients or a tip to give a new use for them.

Brownies  and Birthday Cake -- When its the second day and they've not been devoured yet, I cut in thin layers or small cubes and bake it again for 5-10 minutes at 350 F. They become crunchy sweet croutons to cover yogurt or ice-cream.

Beans Casserole -- It makes a wonderful base for a soup. The vegetarian soup Liquid V is one of them.

Couscous  (picture) -- Can easily be transformed as a main ingredient for a Frittata.

Pasta Dish -- I normally prepare a Minestrone using the pasta, adding some more herbs, lemon peel and beans.

Rotisserie Chicken -- After Darienne published her Lazy Stock, I always go for it! Also you can use it for her Chicken Tortilla Soup  or Chicken Salad

Roasted Pork Loin -- If there is something left, I use it to prepare a Mexican dinner. I shred the meat and stir fry in hot olive oil with fresh bell peppers, purple onions and finish with tomato sauce. They can be then served with tacos, tortillas or rice.

Salad Dressing prepared the day before -- I use as a marinade to grill meat, adding more olive oil and salt.

Sandwich Bread Crusts - They become a nice addition to a party tray after being toasted for 10 minutes in the oven (350F) and can be used to with dip.

Do you have any tip to share? You are invited to include it on comments.  We will be delighted to try it!

Sunday, January 17, 2010

Tips & Gadgets: Help With Meal Planning

I shared my tip for painless meal planning on Friday. If you'd like more help, check out the following links for free menus and meal plans, a guide to seasonal ingredients, and subscription-based menu planning services. If you have another resource or tip to share, please do so in the comments.

  • Cook for Good: A Month of Menus: Seasonal menu plan with breakfast, lunch, snacks, and dinner -- and a breakdown of the grocery tab. Recipes are on the site and/or available in an e-book.
  • NoTakeOut.com: Complete menus with shopping lists and game plans, delivered to your inbox for free and available on the site.
  • Real Simple: A Month of Dinners: Six basic recipes adapted to make 28 different meals.
  • Serious Eats: Dinner Tonight: Quick and easy dinner recipes, posted weekdays.
  • Epicurious Seasonal Ingredient Map: Find out what's in season wherever you live, then find related recipes and tips.
  • Dine Without Whine: Service provides family-friendly recipes, each taking an hour or less, for five meals a week, plus side dish suggestions, some desserts, and grocery list ($6.95/month).
  • Relish!: With this service, pick five meals, all ready in 30 minutes or less, and get recipes and shopping lists ($7/month).
  • Stolen Moments Menu Planning: Service provides customizable menu plan, grocery list, and tips. Dinner-only, or additional meals (starting at $9.95/month).

Friday, January 15, 2010

Tips & Gadgets: Meal Planning, Simplified

Meal planning is a great way to save money, waste less food, and make dinner time less stressful. But if you find it tedious to flip through cookbooks and draft a new plan every week or two, you might like this time-saving approach:

I created a two-week menu plan in my Google calendar that repeats forever. It's my fallback, don't-have-to-think-about-it plan, one that works when everything else in life has exploded in chaos.

It works because it's basic, balanced, and brainless:
  • Basic in that it relies on pantry ingredients, seasonal produce, stuff in the freezer -- what we usually have on hand. 
  • Balanced because it follows the rhythm of our week, with thawed dishes for our busiest days and more involved meals, like homemade pizza, when we have time together as a family. 
  • And brainless because these are meals we can prepare without recipes -- and without paying much attention, on those evenings when the kids are overtired and squabbling and it's hard to hear yourself think, much less follow a recipe.
Pen and paper might work fine for you, but Google calendar and iCal work best for me. I include links to online recipes and note cookbooks and page numbers. Automatic reminders ensure I remember to soak dried beans or thaw an entree in time. And the endlessly repeating plan means I don't have to spend another minute thinking about what to prepare unless I want to.

Sound boring? It could be, but with that basic infrastructure in place, I can customize to my heart's content.

If an invitation to dinner falls through at the last minute, I revert to my fallback plan without missing a step. If I want to try a new recipe, I scratch Thursday's stir-fry and substitute the new one, just for that day. And if we love that new recipe, it might knock stir-fry out of the lineup and become an every-other-Thursday meal. There are no scheduled days for dining out. Since the fallback plan relies on staple ingredients, it's easy enough to shelve the night's menu and head out to a restaurant instead.

Here's my current default dinner plan, set up as Week 1/Week 2:
Sunday: roasted chicken/vegetarian chili or soup
Monday: turkey sausage and pasta
Tuesday: leftover chicken with greens/pork tenderloin
Wednesday: chicken cordon bleu/chicken piccata
Thursday: veggie stir-fry/salmon
Friday: pizza
Saturday: Chinese pork and kale/steak with roasted root vegetables
    The fallback plan changes with our mood, our schedule, and the seasons. Next week, for example, I subbed in different meals every day. When cherry season starts around April, Tuesday's pork tenderloin will be roasted with cherries, and come July it may be elbowed aside by zucchini and tomato entrees or something from the grill.

    If you need more help, check out these sites offering free plans, recipes, and subscription-based services.

    What works for your family? If you have your own tips, please share them in the comments below.

    Tuesday, January 12, 2010

    Playdate Special: Our Open (Minded) Oven Sandwich

    Serve on the table some very fresh slices of bread and cute cookie cutters. Wait a little bit and then bring on the milk. Aprons are also recommended. Add kids to the equation and give them lots of ingredients to choose from. The result: A sandwich tower? A minimalist sculpture? A scrumptious work of art? A disaster? A gourmet creation? All of the options above are possible!
    When I invited all our kids to make an open sandwich during the playdate, I thought about lots of things. The best part -- in my mind -- would be to witness their choices for ingredients. And the wait for all those good-looking creations to come out of the oven would be rewarding.
    The whole process was so fun. Some ingredients were devoured in the prep -- but then, who does not eat occasionally while cooking?
    I elaborated on an adaptation of my mom's recipe for a very simple oven sandwich that she used to prepare for me when I was a kid. I added some nice touches of French croque monsieur, buying real Swiss cheese (Gruyere is a real good option), wild Coho smoked salmon, very fine cuts of Black Forest ham, and most definitely bread with no sugar.
    Using large, kid-friendly cookie cutters, they got rid of the crust using their favorite shapes. Kids had fun. Diogo went for green onions and tons of dill on top of his. Our little chef Arwen was really creative: She assembled her sandwich with salmon and ham in each of the layers. That was the inspiration for the sandwich I prepared for us moms. We also had a bowl of split pea soup each, and used sourdough bread for our sandwiches. That was hmmm... almost a bistro lunch.

    Open Oven Sandwich

    The secret to moistening the bread is to quickly bathe it in milk. That will provide the right amount of moisture to the bread. Beware of soaking the bread for too long: That will make the sandwich soggy.
    The recipe that follows is the suggested amount for one portion, inspired by one of the kids' own compositions. For kids I suggest setting out all ingredients so they can choose from a wide variety of veggies and cuts. Of course, keep them away from the oven!

    2 or 3 slices sandwich bread (crust off is optional)
    1/4 cup milk (enough to moisten the bread)
    1 slice smoked wild salmon
    2 teaspoons cream cheese
    dill, dried or fresh, to taste
    1 tablespoon tomato sauce
    2 slices Black Forest ham
    2 slices Swiss cheese
    1 slice of tomato
    green onions to taste
    shallots to taste
    basil, dried or fresh, to taste

    Pre-heat oven to 350 F. Moisten bread in milk. On top of moistened bread, assemble the first layer with salmon, cream cheese, and dill. Moisten the second slice of bread in milk, layer it on top, and cover it with tomato sauce, black forest ham, cheese, and a little slice of tomato, green onions, shallots, and basil on top. Put in the pre-heated oven and bake for 20 minutes.

    Tuesday, January 5, 2010

    Playdate Special: Pizza Lollipops

    A friend mentioned making sugo di carne -- a rich dish of beef braised in chianti and espresso -- for Christmas, and I was immediately obsessed. What a perfect combination! The main dish was set for our New Year's Day celebration. Anna would contribute caponata, another friend would bring tiramisu.

    And then on New Year's Eve, my husband asked: What are the children going to eat?

    Good question. Pizza lollipops to the rescue! Fast, easy, and foolproof, and vaguely in keeping with the Italian menu.

    I haven't scientifically tested this theory, but I'm pretty sure my kids will eat almost anything on a stick. Their school lunches often include toothpick kabobs with chunks of fruit, bits of cheese and deli meat, or vegetables. Our only flat-out failure was packing a sandwich-on-a-stick with sliced turkey and cheese wrapped around a pickle -- way too slimy by lunch time.

    One of our greatest successes, however, has been pizza on a stick. I can't claim credit for the idea: There are quite a few variations floating around the Internet, many involving wrapping strips of dough around a skewer of meat and/or vegetables. The one I like best right now comes from Artisan Bread in Five Minutes a Day. You could use any homemade pizza dough, and I would think these would work fine with refrigerated pizza dough.

    I insert lollipop sticks for packing these in lunch bags, or I skip the sticks and pack them as pizza wheels. With just a handful of sticks left, I used bamboo skewers for our gathering. The pizzas swiftly disappeared, and then we had to disarm six kids. I strongly recommend using lollipop sticks with young kids, or forgoing the sticks completely and serving these as pizza wheels or pizza buns.

    We made two versions for Friday's dinner. One was simply dressed with tomato sauce with mozzarella and cheddar. For the second, I used homemade, nut-free sun-dried tomato pesto (thawed from the freezer) with lemon and cilantro poultry sausage, mozzarella, and parmigiano reggiano cheese. Both flavors were devoured at an equal rate, so it's safe to say you can make these as simple or fancy as you'd like. If you're trying to sneak in vegetables, this is an easy way to do it.

    Here are the simple instructions -- no measurements, because you should be able to wing it.


    Pizza Lollipops

    You can easily freeze the slices, before or after baking. You also can wrap and refrigerate the log a few days before slicing and baking. Adapted from Artisan Bread in Five Minutes a Day.

    pizza dough, enough for one pizza, either homemade or refrigerated pizza crust
    tomato sauce or pesto
    toppings, sliced thin or chopped small (optional)
    shredded cheese
    olive oil (optional)

    Preheat the oven to 375 degrees. Prepare two baking sheets: For homemade dough, use parchment paper or a sprinkling of cornmeal; for refrigerated pizza crust, use non-stick spray.
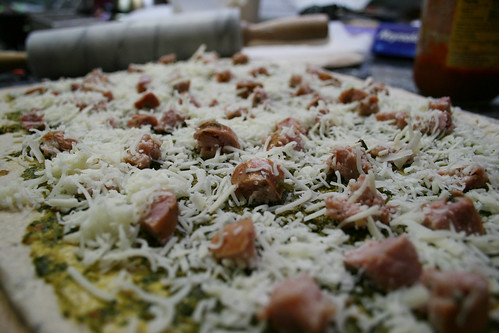
    Roll your pizza dough into a 1/4-inch-thick rectangle. Spread with sauce. If you're using toppings, add a thin layer. Don't make it too thick or the rolls may fall apart. Finally, top it all with a good amount of shredded cheese.
    Starting at the long end of the rectangle, carefully roll the dough into a log and pinch the seams closed. Be careful to roll firmly; I tend to roll it too loosely and have to pinch things back together when I lay out the slices.

    Using kitchen scissors, cut 3/4-inch slices from the pizza log and set the slices onto the baking sheet. Leave plenty of room between them; I fit six to eight on one sheet. Brush the edges lightly with olive oil. Refrigerated crust could go straight into the oven; homemade dough should rest for 15 minutes, if you have time and patient kids.

    Bake for 10 to 15 minutes until dough is puffed and cheese is melted and smells delicious. Remove from baking sheet and insert sticks. Serve as-is or with a small bowl of pizza sauce for dipping.

    LinkWithin

    Related Posts Plugin for WordPress, Blogger...