Showing posts with label crafts. Show all posts

Monday, December 16, 2013

Mashed Potato Snowman


If you happen to live in a place where it doesn't snow,  like we do,  you might use this idea to make the kids have a little winter cheer with something else. It was the last hands on class I gave to second and third graders at school this year, after a series of edible craft sessions, which included sweet potatoes and green beans turkeys and a pea spread cemetery for Halloween.

The project to celebrate the end of the year was to make a snowman out of mashed potatoes and other foods, and the result was so much fun. We made those my son's classroom today with second and third graders. They were really thrilled to work on the project and eat it right away after finishing.

I baked the potatoes at home, and when I brought them to school, they were ready to be peeled with the tiny fingers and mashed easily with forks. Carrots became little noses, bell peppers for the mouths, but of course, some children's couldn't refrain to think outside the model and made...something completely different!


You will need: 

One medium organic baked russet potato per child
Enough mini carrots to make noses
Cooked black beans for buttons
Crimini  mushroom tops for hats
Red bell peppers for the lips
Cooked peas for eyes
Parmesan cheese to dust the snowman
Salt to taste


Invite the kids to peel and mash the potatoes, and use their imagination! You might be surprise that they might come up with something like this:


Or that:


The process is fun and can be a little messy, but they were so proud to see their artwork ready to eat with all their classmates when they finished:


Friday, February 8, 2013

Valentine inspiration

I always look forward to making valentines with my kids — until we're a quarter of the way done and I remember my kids don't like glitter and glue nearly as much as I do.

We're starting on our collective 50-plus valentines this weekend. If you're looking for some inspiration, I rounded up some of my favorite simple, boy-friendly designs on Pinterest — click on over to check them out.


Two of my favorites:

Lines Across showcases a simple stamp made with craft foam strips for creating cross-hatch designs. It's a brilliant way to quickly decorate a lot of paper real estate. And it's versatile — when you're done with valentines, put it to work on other projects. Love the whale she features in the same post.

And this lovely template at Inchmark is a sweet way to encourage kids to make thoughtful valentines without a lot of work: Use a line-drawing portrait template kids can customize for each friend.

See all my favorites at Pinterest!


Friday, December 21, 2012

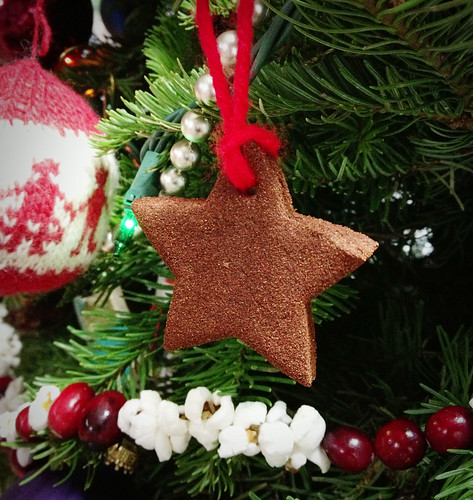
Cinnamon Applesauce Ornaments

121221_CPE_cinnamon ornaments


These fragrant decorations are a wonderful sensory project to make with kids. Your home will smell delicious for days, and the finished ornaments carry the warm smell of cinnamon for years. This season, we used them as package decorations for the boys' gifts to family, friends, and teachers.

These can take several days to air-dry, but you can have finished ornaments within a day or two by using the oven or a dehydrator.

This recipe calls for glue to help make solid, long-lasting ornaments. These are not edible: Be sure your children know the dough is not safe to eat. I've tried fully edible versions, which omit the glue, but we all were frustrated with the crumbly results. If you're craving spiced cookies after this project, wash your cookie cutters and make Agave Gingerbread People!

Cinnamon Applesauce Ornaments

2 cups applesauce
2 cups ground cinnamon (feel free to work in other favorites, such as allspice, cloves, or cardamom)
1/4 cup white glue

In a bowl, stir together cinnamon, glue, and 1 1/2 cups applesauce. If dough is dry, gradually add remaining applesauce as needed to get a workable dough. If the dough ends up too wet, add more cinnamon.

Briefly knead dough on a board dusted with cinnamon. Roll out to 1/4-inch thickness. Use cookie cutters to make shapes and set on a baking sheet covered with a silicone mat, waxed paper, or foil. If you want to hang your ornaments, be sure to poke a hole at the top — a straw works nicely.

To dry: Dry in an oven set no higher than 200 degrees for a few hours, turning every so often. Remove to a wire rack and continue to air dry as needed. If you have a dehydrator, use it!

Hang dried decorations as-is, or get out the glue, glitter, and sequins and decorate as you wish. Enjoy!

Monday, December 3, 2012

13 easy DIY gifts from the kitchen kids can make

121204_CPE_DIY gifts
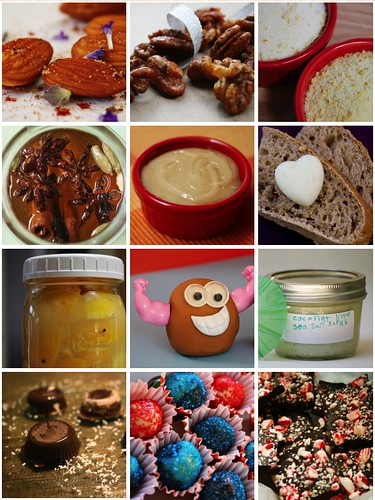
1. Smoked Paprika Almonds, 2. Spiced Nuts, 3. Citrus Salt, 4. Infused Honey, 5. Creamed Honey, 6. Butter, 7. Preserved Lemons, 8. Play Dough, 9. Coconut Lime Scrub, 10. Fleur de Sel Bon Bons, 11. Brigadeiros, 12. Peppermint Bark


We have a baker's dozen simple kitchen gifts that are kid-friendly and fun to make. Most require few ingredients and have a shelf life of at least a few weeks.

1. Roasted Almonds with Smoked Paprika and Lavender: A seductive snack for people who like a little spice in their lives.

2. Best Spiced Nuts: Make a double batch. Or triple. Trust us. Garam masala and Sriracha make these addicting.

3. Citrus Salt: Put lemon, lime, and orange rinds to good use in a terrific finishing salt.

4. Infused Honey: We haven't featured this before, but it's an easy one. Add spices or very dry herbs to a jar of honey. Let it sit for a week or two, then strain and enjoy. In years past we've made vanilla, sage, lavender, lemon, and more. Pictured above is this year's batch: star anise, cinnamon, cardamom, cinnamon, and vanilla.

5. Creamed Honey: Liquid honey plus a dollop of creamed honey yields a big batch of homemade creamed honey. This takes a few minutes on the stove top and then two weeks' waiting time. Next year I want to try making creamed honey from infused honey...

6. Butter, Straight Up and Flavored: Start with cream, or skip ahead and blend herbs, spices, and other seasonings into softened butter. Pack into molds or roll up into a log for a creative gift.

7. Preserved Lemons: This takes a few weeks, but it's mostly waiting-around-time. Be sure to include some tips on how to use this tasty condiment.

8. Perfect Play Dough: What better gift to give young friends? Make any color you fancy, mix in a little sparkly glitter, add scents — a wonderful gift to personalize.

9. Coconut Lime Sea Salt Scrub: A fun sensory project to make, and a big hit with our teachers last year.

10. Fleur de Sel Bon Bons: This is a little messier than the other projects, but if you're up for it you and the kids will have a blast playing chocolatier in your kitchen.

11. Brigadeiros: Another slightly messy one, but messy stuff is usually the most fun. These delectable little candies disappear at parties — give a tray in little paper cups.

12. Peppermint Bark: A holiday classic, simple and delightful. Easy to make huge batches.

13. Vanilla Sugar: A super-simple bonus! Stick a vanilla bean in a jar of sugar. Done. It takes a few weeks for the flavor to infuse, but it lasts forever. It's a great way to extend the life of scraped pods too. (I get a pound of vanilla beans each year — that's about 100 — for $20 to $30 from this site.)

What are you making for gifts this year? We'd love to hear!

Tuesday, October 30, 2012

Spider Cupcakes


Happy Halloween!
Those spook-tacular spider cakes are our favorite treat this year. They are dairy-free, egg-free, and very delicious. Kids had a great time decorating them and making their own versions of spiders, with different choices of colors and ingredients.

I found this recipe for the cupcake a couple years ago, when confronted with the many food allergies at school, and I tested it many times. It can be found here at one of my favorite DIY websites:

Best Chocolate Cake Ever (and it happens to be vegan) 

It's amazing and its light texture is ideally what we want for a cupcake. Also I've been working on ideas for healthier cake decorations and frosting ideas for years, and this was a great opportunity to use some of them.

The decorations were our choices of natural-colored candies and fruit leather, and, as you can see in this wonderful retro-like photo, taken by Darienne, even some cereal and white chocolate. That means they're still attractive and edible after the eyes and spider legs are devoured by our little monsters.

If you want to trick your friends and kids with a vegan alternative that tastes as good as a regular one, this is your treat to try!  Enjoy.


Healthy Spider Decorations
Trader Joe's and Whole Foods carry lots of no-artificial colors candies that can be used here. Our choice for fruit leather was TJ's boysenberry, but any other will work.
6 fruit leather bars
1 cup cereal (Cheerios, Joe's O's)
1 box coated sunflower seeds (these have a bit of milk chocolate, so they should be avoided if choosing a strictly vegan cupcake) or tiny pieces of strawberry for fangs and dry rasperry bits for eyes
white chocolate chips
children's scissors

Invite kids to cut the legs and create their own spider face with the decorations. Use the chocolate glaze printed with the original recipe like a glue, while it's still warm. Let cakes dry a bit (if you have time), and serve them on a web of treats...

Thursday, October 4, 2012

Shrunken heads

121002_CPE_shrunken-heads_1


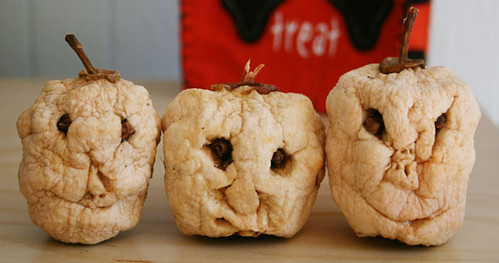
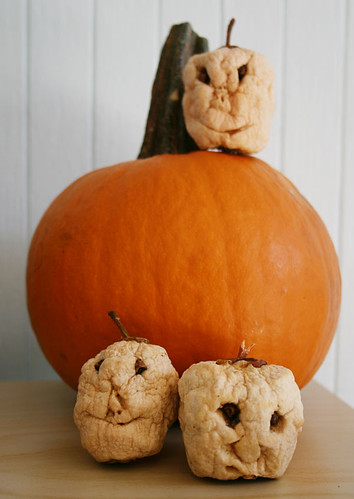
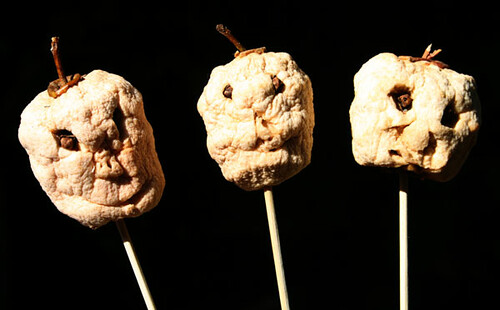
I think we called these apple dolls when I was little, but shrunken heads is so much more appropriate, don't you think? We've had these ghoulish heads impaled on stakes in a flowerpot on our counter for the past two weeks. I rather like them this way, but the kids want to give them mummified bodies.

The finished apples are leathery, soft enough that you can use a needle and thread to sew in a hanger. When I was a girl, we fashioned hangers out of paper clips and stuck those in when we carved the apples. If you remove the core, you can stick the dried apple atop a bottle, then decorate the bottle as a body. Or you could just leave them impaled on sticks — you know, as a warning to the other apples.

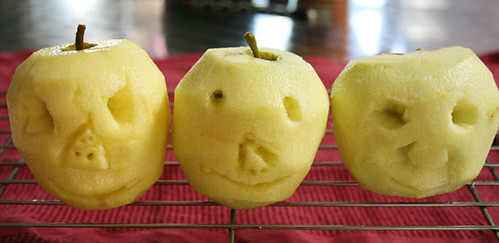
120919_CPE-apples-before
The before picture

These are so easy and fun to create with kids, and they make perfect Halloween decorations. We used pointy pencils to scratch out the features, then I carved them with a small jackknife. The kids checked them daily, checking out how the texture changed as the moisture evaporated.

Apple heads can take as long as three weeks to dry, so don't wait until the last minute! I hear they can last for years, but I can't personally vouch for that — yet.

When they're done, you can even sew or glue on yarn for hair and decorate them however you wish.

121002_CPE_shrunken-heads_2


Shrunken heads

apples
1/2 cup lemon juice
1/4 cup salt
2 to 3 cups water

Combine lemon juice, salt, and water in a bowl and set aside.

To make each head, first peel the apple (no need to remove the core, unless you want to fit the finished apple on a bottle) and soak it in the bowl of lemony salt water for a minute or so.

Draw features on the apple with a pointy tool — a toothpick, a small skewer, a paring knife. Kids can use a pointy pencil. Then use a paring knife or other small tool to carve out the features. Remember: It will shrink, so keep it simple and don't fuss over details. If you like, insert whole cloves into the eyes or dried rice as teeth.

Soak the carved apple in the lemony salt water and soak for a few minutes. Remove it, pat it dry, and decide how you're going to let it dry. You can set it on a wire rack, stick it on a skewer, fashion a paper clip hanger — just don't set it on a plate or it will get moldy fast. It will take one to three weeks for your apple head to dry.

To kick-start the process, put your freshly cut apple in the oven at a low temperature — no more than 175 degrees — for an hour or two.

Keep an eye on your apple: If mold starts to form, gently scrape it away. You also can spritz it with a weak bleach solution.

121002_CPE_shrunken-heads_3

Tuesday, May 15, 2012

Perfect Play Dough


I can't believe we don't have a play dough recipe on this site! I've tried countless variations on classic play dough and this is what I've worked out as my favorite. It takes a few minutes of stirring on the stove top, but that minimal effort yields a soft, pliable, non-toxic material that's easy to shape and mold.

I whipped up these two batches for a recent playdate: My preschooler asked for "Star Wars colors" so his friend could try the R2-D2 play set. They especially enjoyed manipulating the still-warm dough, which I scented with vanilla — my son's favorite.


Perfect Play Dough

This makes about 14 ounces of soft, easy-to-handle dough. Packaged well, it should last a good long time. I don't know how long, because my kids let some creations dry and mash the rest into oblivion. I've stored it well over a month with no problems.

1 cup all-purpose flour
2 teaspoons cream of tartar
1/4 cup salt
1 cup warm water
1 1/2 teaspoons vegetable oil
food coloring (optional)
essential oil or flavored extract for scent (optional)

Combine flour, cream of tartar, and salt in a small saucepan. In a measuring cup, combine water, oil, and food coloring or scent, if using. (I don't measure extracts added for scent — add a little, smell, and add a little more if it isn't strong enough.) Pour liquid ingredients into dry ingredients and stir to combine.

Over medium heat, stir mixture continuously until the dough forms a ball. It will start to get clumpy first, and your arm will be tired of stirring, and you’ll think the recipe isn’t working. Keep at it a few minutes more and it will turn out just fine.

Turn dough out onto a silicone mat or cutting board. Let it cool a few minutes, then knead a few times until smooth. Wrap in plastic wrap and store in an airtight container.


Thursday, April 26, 2012

Coconut Lime Sea Salt Scrub and More Kitchen Gifts for Teachers & Moms


Every parent I know is running around like a chicken with its head cut off this time of year. Spring sports schedules, a rush of field trips to chaperone, a string of special programs to attend at school... And don't forget about gifts for Teacher Appreciation Week and the grandmas for Mothers Day — both of which take me by surprise every single May.

The best gifts for teachers, grandmas, and other special people in your child's life of course are ones your child can help make. Extra credit goes to homemade gifts that are fast, simple, and fun.

I'm guessing that at this time of year, many teachers dream — as I am — of chilling on a tropical beach with something frosty in hand. I'd love to give my son's teacher a margarita, but this Coconut Lime Sea Salt Scrub probably is more appropriate. It gently exfoliates and moisturizes to get your skin beach-ready, and the scent transports you to the tropics. A little jar of this will help your hardworking teacher cope with the crazy final days of school.

Enlist your little one to help mix this glorious goop. It's technically edible, but I wouldn't recommend nibbling any. For better-tasting gifts kids can help make, a few of our go-to recipes:


Coconut Lime Sea Salt Scrub

Given the high salt content, this should last for at least a few months. I store homemade scrubs in the refrigerator to be on the safe side. This recipe makes about 3 cups. If you prefer a sugar scrub, swap brown or raw sugar for the salt and use equal amounts of oil and sugar. 

1 cup coconut oil
1/3 cup grapeseed, almond, or olive oil
2 2/3 cups sea salt
finely grated zest from 2-3 limes
squeeze of lemon juice

Gently heat the coconut oil in a saucepan or the microwave until it's just softened—you should be able to stir it easily. Stir in the grapeseed oil.

In a medium bowl, combine salt and lime zest. Stir in the oil and a squeeze of lime juice. (Because it's coconut oil, it will become much firmer when it's cool.) Package in cute jars and let your child decorate them.

To use, scoop up a bit of the scrub and rub on your fingers, feet, or body to exfoliate and refresh. Rinse thoroughly, especially if you use it on your feet!

LinkWithin

Related Posts Plugin for WordPress, Blogger...