Friday, December 21, 2012

Cinnamon Applesauce Ornaments

121221_CPE_cinnamon ornaments


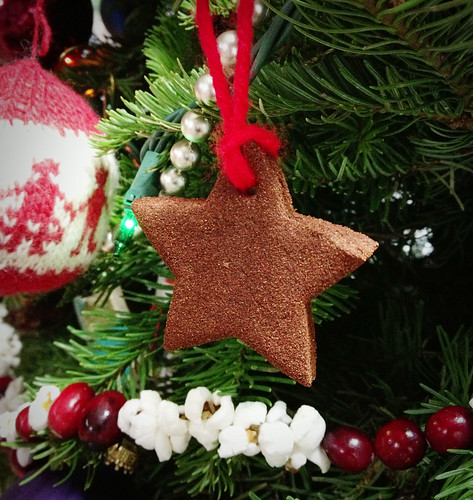
These fragrant decorations are a wonderful sensory project to make with kids. Your home will smell delicious for days, and the finished ornaments carry the warm smell of cinnamon for years. This season, we used them as package decorations for the boys' gifts to family, friends, and teachers.

These can take several days to air-dry, but you can have finished ornaments within a day or two by using the oven or a dehydrator.

This recipe calls for glue to help make solid, long-lasting ornaments. These are not edible: Be sure your children know the dough is not safe to eat. I've tried fully edible versions, which omit the glue, but we all were frustrated with the crumbly results. If you're craving spiced cookies after this project, wash your cookie cutters and make Agave Gingerbread People!

Cinnamon Applesauce Ornaments

2 cups applesauce
2 cups ground cinnamon (feel free to work in other favorites, such as allspice, cloves, or cardamom)
1/4 cup white glue

In a bowl, stir together cinnamon, glue, and 1 1/2 cups applesauce. If dough is dry, gradually add remaining applesauce as needed to get a workable dough. If the dough ends up too wet, add more cinnamon.

Briefly knead dough on a board dusted with cinnamon. Roll out to 1/4-inch thickness. Use cookie cutters to make shapes and set on a baking sheet covered with a silicone mat, waxed paper, or foil. If you want to hang your ornaments, be sure to poke a hole at the top — a straw works nicely.

To dry: Dry in an oven set no higher than 200 degrees for a few hours, turning every so often. Remove to a wire rack and continue to air dry as needed. If you have a dehydrator, use it!

Hang dried decorations as-is, or get out the glue, glitter, and sequins and decorate as you wish. Enjoy!

Tuesday, December 18, 2012

Reindeer's Oat Cookies

 
Maybe Santa is already too full to eat more cookies, but who remembered the reindeer pack?  I bet they will be tired and very very hungry. And... with that little story I convinced the boys to get interested on mixing the ingredients and being happy about eating flax seed and some fruits and nuts they don't usually care for.
    These cookies are good not just for reindeer,  and the left overs are a great way of starting off Christmas day with a bit of something slightly healthier than sugar cookies. It's the perfect pairing for hot chocolate or a cup of nice coffee.
    The recipe is easy and you can bake them on the night before Christmas to have that wonderful smell   to attract the good cheers of the Season. Happy preparations for Santa's landing!

Reindeer Oatmeal Cookies

1/2 cup canola oil
1 cup sugar (brown or turbinado)
2 eggs
2 tablespoons flax seed meal
1 teaspoon vanilla
1 cup all purpose non-bleached flour ( I used organic White whole wheat)
1 teaspoon baking soda
1 teaspoon ground cinammon
1/2 teaspoon allspice
1/2 teaspoon ginger
1/2 cup white or dark chocolate chips or almonds (optional)
1/2 cup raisins
3 cups quick oats (uncooked)
1 - 2 tablespoons water, if needed to moist the dough

Preheat oven to 350 F. Mix oil and sugar with a whisk in a large bowl for about 2 minutes or up to when creamy. Add eggs, whisk more, then bring flax seed meal and then vanilla. In another bowl mix flour, baking soda, spices, raisins and chocolate chips or almond slices. Mix well up to when dough is forming small clutters. If too dry, sprinkle water up to when mix is gooey enough. With the help of an ice cream scooper or spoon, drop 1 tablespoon of dough on a baking sheet covered with parchment paper. Bake for about 12 minutes or up to when cookies are golden in the bottom. Cool them in a wired rack. And make sure to leave some for Santa's transportation guys !

Friday, December 14, 2012

Ice Cream Cake Winter Penguin Fest


December is the craziest month in my home. The two boys' birthdays pile up with Hannukah and Christmas and all the functions that come together for the end of the year. Normally I rush so much that the birthday cakes are not well photographed, and I never get to post about them. The same happens to my latkes, Christmas cookies, and all other festive food prepared for the season.

But this one here was different: It sounded like the easiest cake ever, so I dared to organize my bag with the camera and decorations for the cake and hope that everything would go well before putting the cakes together.

But it was one of the most challenging cakes I ever prepared, because it was a first. The result was so interesting that I decided to share it here, because I could not find a good recipe with step-by-step instructions and had to work with my own intuition.

My 5-year-old, who is turning 6 today, was adamant about having a ice cream cake, and his theme was penguins. I figured out that edible penguins could be added to the side of the cakes, and cute plastic figurines could add action to the penguin playground.

The day before assembling the cake, I baked a single layer in one the molds that became the first base for the rest. But putting it all together was not as easy as I imagined. I had some difficulties, like spreading the ice cream evenly and making sure that all would be set.

The birthday boy helped destroy cookies to make a layer of crunchy yumminess. And later, he celebrate with his friends and an avalanche of ice cream cake. Happy birthday to my creative and inspiring boy!


Ice Cream Cake
You can certainly play with flavors and shapes, and add your own touches. It's best to assemble it one day before the party, and take it out from freezer one hour before serving (depending on the weather). 

                                                        What you will need:

2 springform cake pans
4 1.5-quart tubs of ice cream (I used Breyer's  French Vanilla, Cookies and Cream, and Strawberry)
1 package vanilla-filled chocolate cookies (like Oreos)
1 package vanilla wafers (like Nilla)
1 recipe of cake, baked
1 package mini marshmallows (for hot chocolate)
1 tub whipped cream
1 package (or less) jumbo-size marshmallows
Penguin-shaped cookies and chocolates

Cover the bottoms and sides of the springform pans with parchment paper. Bake one layer of your favorite cake recipe on the bottom in each pan. On the next day, top the cooled cake with a layer of ice cream and then crumbled chocolate cookies. Cover with parchment paper and gently pound with a flat kitchen tool (I used a potato masher) to level it. Put cake in freezer for one hour, and then add the second layer of ice cream. Top with whole vanilla wafers. Repeat layers until both molds are full of ice cream and cookies.

When taking out of the pan, cover with whipped cream and marshmallows and decorate. To prevent an avalanche (like the one I had here with chocolate),  use vanilla or cream ice cream on the last layers to mix the white with the white cream so to avoid a "landslide" of chocolate ice cream.


Thursday, December 6, 2012

Spiced Coconut Panna Cotta

2012117_CPE_Panna Cotta


Once upon a time, having meatless friends over for dinner inspired panic: The vegans are coming! The vegans are coming! Luckily, my most frequent veggie-loving guests are flexible and appreciative of even the simplest vegetarian presentations, and I'm getting better at rising to the occasion.

Desserts still challenge me: Fruit is an elegant, straightforward finish to a meal, but the kids are inevitably disappointed. I know many of the tricks for making baked goods dairy-free, but as the daughter of an excellent baker I find myself missing the real thing.

This rich, dairy-free panna cotta, made with coconut milk and coconut cream, just might top any of the dairy versions I've had. Cardamom, allspice, vanilla, and cloves infuse it with just the right spicy kick. Best of all, you can make it well before your guests arrive.

I used coconut cream I found at Trader Joe's along with full-fat coconut milk. You can make a lighter version with a blend of regular and low-fat coconut milk, but you need some fat to keep it creamy. I love the vanilla bean speckles, but if you want a pure white panna cotta either substitute vanilla extract or keep the bean intact.

Spiced Coconut Panna Cotta

I used one 14-ounce can of coconut milk and 10 ounces of coconut cream. You can use up to 2 cups of low-fat milk with a cup of full-fat milk. This makes 6 to 8 servings. Don't feel tied down by the specific spice ingredients here — adapt types and amounts to suit your taste and what you have on hand.

3 tablespoons water
1 package gelatin
3 cups coconut milk (can use a combination of milk and cream, but don't use more than 2 cups of low-fat coconut milk)
1/2 cup sugar
1 vanilla bean, split and scraped (or substitute a splash of vanilla extract, preferably clear)
15 cardamom pods, gently cracked open
3 allspice berries
3 whole cloves
1 star anise

Sprinkle gelatin over water and let sit for 5 minutes. Warm cream over low heat and add gelatin, stirring to dissolve completely. Add sugar and cook, stirring, over medium heat, until mixture just begins to steam. Turn off the heat, add vanilla bean and spices, cover, and let sit for 20 to 30 minutes.

Lightly oil 6 to 8 ramekins. Pour mixture through a fine mesh strainer into prepared ramekins and chill at least three hours or until set.

To serve, run a knife around the inside edge of each ramekin. Turn upside-down over a plate to unmold. Serve garnished with toasted coconut, chopped pistachios, toasted sliced almonds, or a drizzle of pomegranate molasses.

Monday, December 3, 2012

13 easy DIY gifts from the kitchen kids can make

121204_CPE_DIY gifts
1. Smoked Paprika Almonds, 2. Spiced Nuts, 3. Citrus Salt, 4. Infused Honey, 5. Creamed Honey, 6. Butter, 7. Preserved Lemons, 8. Play Dough, 9. Coconut Lime Scrub, 10. Fleur de Sel Bon Bons, 11. Brigadeiros, 12. Peppermint Bark


We have a baker's dozen simple kitchen gifts that are kid-friendly and fun to make. Most require few ingredients and have a shelf life of at least a few weeks.

1. Roasted Almonds with Smoked Paprika and Lavender: A seductive snack for people who like a little spice in their lives.

2. Best Spiced Nuts: Make a double batch. Or triple. Trust us. Garam masala and Sriracha make these addicting.

3. Citrus Salt: Put lemon, lime, and orange rinds to good use in a terrific finishing salt.

4. Infused Honey: We haven't featured this before, but it's an easy one. Add spices or very dry herbs to a jar of honey. Let it sit for a week or two, then strain and enjoy. In years past we've made vanilla, sage, lavender, lemon, and more. Pictured above is this year's batch: star anise, cinnamon, cardamom, cinnamon, and vanilla.

5. Creamed Honey: Liquid honey plus a dollop of creamed honey yields a big batch of homemade creamed honey. This takes a few minutes on the stove top and then two weeks' waiting time. Next year I want to try making creamed honey from infused honey...

6. Butter, Straight Up and Flavored: Start with cream, or skip ahead and blend herbs, spices, and other seasonings into softened butter. Pack into molds or roll up into a log for a creative gift.

7. Preserved Lemons: This takes a few weeks, but it's mostly waiting-around-time. Be sure to include some tips on how to use this tasty condiment.

8. Perfect Play Dough: What better gift to give young friends? Make any color you fancy, mix in a little sparkly glitter, add scents — a wonderful gift to personalize.

9. Coconut Lime Sea Salt Scrub: A fun sensory project to make, and a big hit with our teachers last year.

10. Fleur de Sel Bon Bons: This is a little messier than the other projects, but if you're up for it you and the kids will have a blast playing chocolatier in your kitchen.

11. Brigadeiros: Another slightly messy one, but messy stuff is usually the most fun. These delectable little candies disappear at parties — give a tray in little paper cups.

12. Peppermint Bark: A holiday classic, simple and delightful. Easy to make huge batches.

13. Vanilla Sugar: A super-simple bonus! Stick a vanilla bean in a jar of sugar. Done. It takes a few weeks for the flavor to infuse, but it lasts forever. It's a great way to extend the life of scraped pods too. (I get a pound of vanilla beans each year — that's about 100 — for $20 to $30 from this site.)

What are you making for gifts this year? We'd love to hear!

LinkWithin

Related Posts Plugin for WordPress, Blogger...