Friday, May 28, 2010

Second Helping: Strawberry Grapes Cocktail with Juniper Berries and Mint


It was a sunny and lazy Sunday.  All needed to add charm to my backyard BBQ was a fresh cocktail with no alcohol. Last time I was in that mood I tried a virgin mojito in a local tapas bar. The mix of sugary soda and mint didn't please me, so I decided to create my own. Here it is.  I shared the drink later on our playdate and the kids and moms loved it.  Cheers!

Strawberry and Grapes Cocktail

With some not so fresh strawberries and grapes, I prepared a syrup-like compote, simmering the fruits with orange juice. I used the mix as a base for the cocktail. If you are willing to try an alcoholic variation you can add some gin or limoncello.

2 tablespoons Strawberry and Grapes Compote (recipe below)
1/2 cup sparkling mineral water with lime
1/4 cup apple juice (optional)
4 leaves fresh mint, chopped
Ice (optional)

Add all ingredients, stir slowly and add fresh chopped mint on the top.

Strawberry and Grapes Compote

1 cup whole strawberries
1 cup seedless red grapes
1 cup fresh orange juice
5 or 6 juniper berries, dried

Simmer all for about 30 minutes or until the fruits are smooth. Refrigerate and reserve for the drink.

Friday, May 21, 2010

Second Helping: Lavender and Chamomile Ganache

IMG_6015


The simplest way to flavor ganache, as in yesterday's post on rose ganache, is to stir in extract, spices, or zest.

Another way is to steep herbs in the cream for delicate, unusual flavors. It isn't much more work, though it takes a little more time. Gather fresh herbs and add them to the heated cream, making sure they're completely immersed. Cover the pan and let it sit for up to half an hour, strain, and reheat the cream to finish the ganache.

Lavender ganache added a lovely touch to chocolate birthday cupcakes, topped with a generous helping of vanilla bean icing (hello, new favorite cupcake!).

The leftover ganache went into the fridge to firm up while I made batch of ganache with apple-scented chamomile flowers and lemon verbena, this time with white chocolate. Both were rolled into truffles, along with the leftover rose ganache, and tucked into gift boxes.

 For more tips on making and using ganache, check out yesterday's post. If you have a favorite flavoring for ganache, I'd love to hear about it in the comments below!


Lavender Ganache

Be sure to use culinary lavender, preferably organic. Lavender from a florist or picked off your neighbor's plant may be treated with chemicals that aren't approved for edible crops.

This technique works with any fresh herbs -- mint is an obvious choice.

8 ounces heavy cream
12 ounces high-quality chocolate in small pieces -- chopped, chips, chunks
a few sprigs of flowering lavender

Put chocolate pieces in a bowl. In a small saucepan over medium heat, heat cream until just shy of boiling. Immerse lavender sprigs, cover saucepan, and turn off heat. Let sit for 15 to 30 minutes, tasting to check the strength of the lavender flavor. Be conservative -- you don't want this to taste like potpourri. When it's to your liking, pour the cream through a fine-mesh sieve (you may need to do this twice) and discard the lavender.

Return cream to saucepan and again heat until almost boiling. Carefully pour the hot cream over the chocolate and stir until smooth. Alternatively, pour hot cream over chocolate pieces in food processor.

Chamomile and Lemon Verbena Ganache: Substitute chamomile blossoms and sprigs of lemon verbena for the lavender, and use white chocolate.

Thursday, May 20, 2010

Second Helping: Rose Ganache

rose ganache

Ganache is my Swiss army knife of desserts. It's incredibly versatile, as well as easy and elegant: A single batch can be rolled into truffles, poured to glaze a cake, warmed for chocolate fondue, stirred into milk, and much, much more. And then there's just plain eating it off a spoon. The stuff is magic, on the level of unicorns and a cup of coffee that never goes cold.

I turned to ganache a few weeks back when I realized just how much baking I had planned -- for birthday celebrations, thank-you gifts, a school function, and a craving for something indulgent. Spring fever inspired me to try floral notes, including rosewater, lavender, and chamomile. Today I'll share the recipe for Rose Ganache; tune in tomorrow for the other two.

My ganache recipe is very simple: three parts high-quality chocolate to two parts heavy cream, plus any flavoring. This yields a somewhat thick but adaptable ganache. It can be spread on cupcakes or piped onto treats, or refrigerated and rolled into truffles. It also can be thinned with additional cream for glazing a cake. If I plan to make only truffles, I use a 2:1 ratio of chocolate to cream. It isn't an exact science; some recipes call for a 1:1 ratio, others incorporate a bit of butter.

The cream is warmed, then poured over the chocolate. The two are gently stirred together to create a rich, to-die-for emulsion. The finished ganache lasts a few weeks in the refrigerator -- if you can resist the temptation to eat it all -- and freezes well for a few months.

The simplest way to flavor ganache is to stir in flavorings such as spices, extract, citrus zest. The technique is detailed in the basic recipe for Rose Ganache below; tomorrow I'll share a wonderful way to infuse ganache with flavor.

I rolled some of the rose ganache into truffles, but most of it was whipped and piped over rosewater marshmallows, an easy variation on Orange, Chocolate & Pistachio Marshmallows.

A few ways to enjoy ganache:
  • Refrigerate until firm, form into small balls and roll in cocoa powder or cover with tempered chocolate to make truffles.
  • Warm ganache, thin with cream, and use to glaze cake.
  • Use as filling with layered cake, cookie sandwiches, crepes, brioche, lava cake, and more.
  • Stir into milk, warm or cold.
  • Pour over ice cream.
  • Whip for a few minutes and use as frosting.
  • Serve warm with fruit or cubes of cake for chocolate fondue.
Rose Ganache

You can find rosewater in Indian and Mideastern markets, as well as some specialty food shops.

8 ounces heavy cream
12 ounces high-quality chocolate in small pieces -- chopped, chips, chunks
1 tablespoon rosewater, or more to taste

Put chocolate pieces in a bowl. In a small saucepan over medium heat, heat cream until just shy of boiling. Stir in rosewater to taste. Slowly and carefully, pour the hot cream over the chocolate and stir. Don't whisk it -- you're just blending the two together, stirring until smooth. Alternatively, you could put the chocolate pieces in the work bowl of a food processor and pour in the cream while running the food processor. Store ganache in a covered container for up to two weeks.

Variations: Instead of rosewater, substitute a teaspoon or two of extract or liqueur, or spices or citrus zest.

Tuesday, May 18, 2010

Playdate Special: Chicken Cordon Bleu with Sun Dried Tomatoes and Shallots


Irresistible, crunchy, smokey and with some melted cheese. So what would it be?  The image of a Croque Monsieur passed briefly in my mind, but then there was all that butter and all that bread. Then the other image was a dressed up omelette. But all those eggs? The common factor for all of my culinary ambitions were here: Very French style food.
I also would like to make sure that everybody would eat something, even though I knew we probably were all in such a rush last playdate for a two-courses lunch. Kids could also have helped on the cooking, but there was no time for that. 
On the night before I baked a Rhubarb and Strawberry Pie, with a hint of fresh mint and lots of fresh vanilla beans. At least I knew something was totally ready to eat.
I then gathered mentally some of my favorite ingredients and did some research, and found a delicious solution at Tyler's Florence Food Network website. And there it was: a beautiful Cordon Bleu chicken. I used his recipe as a reference and changed some ingredients that would please me more: Smoked Turkey Ham, Shallots and Sun dried Tomatoes. Chicken Breasts would be covering all of those wonderful flavors and textures...  And Japanese style breadcrumbs would guarantee the crunch.
So, I rushed and tried to make them to be ready on time, and started to prepare the rolls early in the morning.
When the clock was close to 11:05, time that everything should be ready to eat, I figured out that  more oven time was needed for the chicken. The solution was to slice the rolls and give them an extra cooking time, on a hot skillet.  Finally all the guests - kids and moms- could taste what I thought to be one of the best menus I chose for the long time. I think they all agreed with the interest they showed while eating, even though it was such a fast lunch. But with no fast food.

Chicken Cordon Bleu with Shallots and Sun-dried Tomatoes

I used julienned sun-dried Roma tomatoes conserve and fresh shallots to be the main personalities of this stuffing. Fresh thyme might be great with those, I just didn't have time to get some from my backyard while preparing the chicken...

4 skinless and boneless breasts of chicken, butterflied
4 slices mesquite turkey
4 slices Swiss Gruyere cheese
1 medium shallot, thinly chopped
4 tablespoons sun-dried tomatoes in olive oil, thinly chopped
Kosher salt to taste
Fresh ground peppercorns
1 egg, beaten
1/2 cup water, added to the egg
1 cup flour
1 cup panko (or normal breadcrumbs), to coat rolls

After butterflying each chicken breast, sprinkle both sides with salt and pepper and cover both sides with plastic food wrap. Pound each side with the flat part of the pounder to get close to 1/4 inches. Remove plastic from one side. Add one slice of Gruyere cheese and one of smoked turkey ham. Spread mix of sun dried tomatoes and shallots over ham. Roll the chicken breast with the help of the remaining wrapping plastic, firmly. Tuck in the wedges and keep all tight with the film. Repeat the same for each breast and keep the rolls on the fridge for at least 1 hour. Preheat oven to 400 F.

Beat egg with water. Remove plastic wrap, and coat the rolls with the mix and coat them with a layer of flour and then Panko (or normal breadcrumbs). Roast for about 30 minutes on the middle rack of oven. Make sure the core is cooked, and slice the rolls. Enjoy!

Wednesday, May 12, 2010

Playdates Past: Two Salmons on Quinoa Bed


We took a few days off to celebrate Mother's Day with our families. While we're on break, we're revisiting some favorite recipes from the archives. We'll be back with something fresh in a few days! I chose this recipe here for its surprising result and good reviews from our kids.

My little pretend-to-be pirates Captain Jack Hook and his matey Captain Bonanza Arco Iris were in the mood to eat fish. That was a novelty. Many times I tried to lure them with all types of fish I know, but all ended up in the garbage and the cook ...was mentally sent to the plank. They had their motives to be so eager to try new food. All costumes of pirates were ready for Halloween and our Sunday was an unusual one: It started on a hunt for different kinds of pumpkins at Farmer's John at Half Moon Bay. And got even better with our mini trip looking at the bay eating fish and chips, calamari and prawns at Half Moon Bay Brewery.

After the weekend I was then brave enough to try fish for our playdate. The following recipe gathered many things that I wanted to introduce to my cooking, but never had courage to do. And the result was a wonderful surprise. As an appetizer the kids... ooops, pirates, had a taste of hard-boiled quail eggs, something very popular for kids in Brazil but never on our table before. They loved them and even asked  this "pirate Cook" to boil another dozen. The "pink fish" was a hit! Not only was the dish tasty and attractive, all of our kids ate it all. And for the humble cook of the pirate ship here, was that blissful sensation of cooking the right fish, with the right taste and texture, and probably a wonderful dose of omega-3,  and all B6 vitamin, protein and goodness of organic quinoa grain. Hey matey!

Wild Coho Alaskan Salmon with Colorful Quinoa

The kids called the translucent grains of quinoa mini pearls and named the salmon as pink fish. I thought that was not just cute, but a wonderful interpretation of a very unusual dish.

1 medium fillet (about 1 pound) of wild-caught Alaskan Coho salmon, skin on
5 slices smoked salmon
2 cups quinoa, cooked as instructed by package
2 stalks celery, thinly chopped
2 cups white cabbage, thinly sliced
3 stems scallions or spring onions, chopped
1 to 2 tablespoons low-sodium soy sauce
1/4 tablespoon sesame oil, drizzled over fish and cabbage
1 teaspoon extra-virgin olive oil
Salt to taste

On a very hot skillet grill put salmon on skin side and sprinkle its surface with salt, scallions and a drizzle, or mist, of sesame oil. Cover it with slices of smoked salmon and let it cook for about 7 minutes or up when skin begins to get crunchy. Turn the fish, keeping the smoked fish with it, and let it shallow fry for more 5 minutes. Set aside. In the meantime prepare quinoa grains with water, adding celery to it, as directed in the package. Reserve on the side. In another skillet, stir fry cabbage in olive oil. Remove smoked fish from the top of fresh salmon and cut in tiny strips, adding to cabbage pan. Take quinoa from pan and mix with the stir fry for about 4 more minutes. Add drizzle of sesame oil and more drops of soy sauce. Serve fish with quinoa "pearls"on the side and double check while dishing it to kids looking for tiny bones.

Tuesday, May 11, 2010

Playdates Past: Lemon Balm Pesto

090813_CPE_pesto_4

We took a few days off to celebrate Mother's Day with our families. While we're on break, we're revisiting some favorite recipes from the archives. We'll be back with something fresh in a few days! This is one of my favorites from last summer.


Classic basil pesto has long been one of my favorite ways to dress up a simple pasta dish. Who doesn't love the bright flavors of summery basil beautifully blended with Parmesan, olive oil, and garlic?

Everyone else in my family, apparently.

But that hasn't stopped me. I work basil into much of my summer cooking, but more often than not my pesto features other flavors my boys enjoy more. Begin by thinking of it as green sauce and then start playing. Experiment with mint, cilantro, parsley, sage, lemon thyme -- keep going, you can think of more. Try them alone or in combination. Incorporating spinach is a nice way to get some extra-good veggies into your kids. As for nuts, try walnuts, pistachio, pumpkin seed, or leave the nuts out entirely.

090813_CPE_pesto_2090813_CPE_pesto_3It's easy to get snobby about pesto, insisting everything must be hand-chopped and that you must grate fresh Parmesan and use a lovely olive oil and mash it together by hand. But I find it easier to be practical and remember that I'm cooking for preschoolers, and a husband who eats like a preschooler. I use the Parmesan in the green can for family meals and mix everything up in the food processor. And I always make way more than I need, freezing leftovers in an ice cube tray for a quick and easy taste of summer all year long.

Lemon balm pesto has become our hands-down favorite. Our favorite preparation involves tossing the pesto with Trader Joe's tri-color ribbon pasta; a cup of shredded, cooked chicken; and a cup or so of halved cherry tomatoes from the garden. It's a rare no-complaints dinner for our family -- and the boys' friends devoured it at our playdate. Every single child, however, rejected the pan-roasted green beans I served with it. Can't win them all.

Lemon Balm Pesto

You can add pine nuts or walnuts if you wish. I sometimes throw in a bit of lemon verbena for an even sunnier taste.

3-5 cloves garlic (more or less depending on taste), peeled
3 cups packed lemon balm leaves
1 teaspoon salt
1 cup olive oil (or more)
a squeeze of lemon
6 ounces grated Parmesan cheese (about 1 1/2 cups)
pepper to taste

Rinse lemon balm well. Pat dry with a kitchen towel or paper towels and remove leaves.
Set up food processor (you could also use a blender). With machine running, drop in garlic cloves and continue running until garlic is minced.
Add lemon balm leaves and salt to food processor. Process until finely chopped. While machine is still running, slowly pour in olive oil and add a squeeze of lemon. Adjust olive oil according to your preference.
Add Parmesan cheese and process briefly. Add pepper and more salt as desired.

Friday, May 7, 2010

Tips and Gadgets: What a mist!


This is the gift I chose for my mother – besides cooking a three-course meal when I visit her. And mom, if you are reading this, sorry to spoil the surprise! This bottle looks like a very sleek perfume mister, but it is actually... olive oil. I've been using mine for a couple of months no, and I can guarantee that it is by far one of the most-used gadget in my kitchen, besides pots and pans.

The first thing I love about it is the ability to use very little oil to coat anything I like to fry, grill, or broil. Normally I fill it with my favorite brand of extra-virgin olive oil, but sometimes I can go sophisticated and dress it up with some herbs or spices. 

There are other brands in the market, but this one caught my eye not just because of its shape but also because of its environmentally friendly characteristics. It's BPA-free and the pumping system is easy and efficient.

Talking about the environment, besides taking care of my family health,  here's a very good reason to opt out of deep-fry cooking, which I already did a long time ago. A friend brought me to attention last Earth Day that much of the oil pollution in the water is caused by cooking oil disposed in the sink. That inspired me post all about this little bottle: At the end of the day, with no excess of oil, you can even dare to prepare French fries with no harm to Mother Earth.  Or perhaps sweet potato fries in the oven, coated with a little mist from this magic bottle.

The asparagus in the picture is just waiting to be grilled with its mist, after being blanched, with some sea salt and garlic.

Here are some recipes that might benefit from the oil mister.
If you are willing to surprise your mom or your kids, this novelty is for you!
Darienne created this delicious thing and I will give it a try in the oven, using the mister to guarantee its crunchiness.
This is one of my favorite party foods and to avoid frying I ended up preparing them with the help of broiler.


Hope you can try one of them for yours or your Mother's Day. And look who came to make part of  the picture: Curious little black cat Juju, who is always interested
in my kitchen gadgets ... and camera! Happy Sunday!

    Wednesday, May 5, 2010

    Second Helping: Grilled Fava Beans with Lemon

    100430_CPE_fava2


    I rely on favas to re-energize my garden over the winter, keeping the heavy soil loose and pumping nitrogen into the dirt in preparation for the spring planting. Last year, I gave the harvest to Anna: I needed to get my tomato seedlings in that spot, and I had no time to peel, boil, then shuck beans. Too much work!

    Then I read about broiled and grilled favas over at Local Lemons, and I saw favas in a whole new light. This is much more my speed: From raw pod to tasty, cooked beans in just minutes. Simply toss the favas with olive oil and seasonings, then broil or grill until blackened on each side. The pods split open, offering up creamy, fresh, delicious fava beans. Even the fuzzy outer covering on each bean tastes good this way. I couldn't get enough of these, and at least one of my kids loves them too. I'm already planning an extra row of favas this fall.

    Tempted to make it? Let us know with the new check-box feature below the post!

    Grilled Fava Beans with Lemon

    Be careful at the grill! When these things get hot, they can split open and start firing off beans like little cannons.

    1 pound fresh fava beans, in pods
    olive oil
    kosher salt
    freshly ground pepper
    zest from 1 lemon
    squeeze of lemon

    Wash and dry beans and put in large bowl. Pour in a bit of olive oil, season to taste with salt and pepper, and toss to evenly coat pods. Lay pods out on a medium-hot grill and cook, turning once, until pods are charred on both sides.

    Remove pods to a serving plate. Sprinkle with lemon zest, finish with a squeeze of lemon juice, and enjoy.

    Tuesday, May 4, 2010

    Playdate Special: Drive-Through Burgers and Fries

    100430_CPE_burger

    My sons turned Friday's playdate into dinner theater, proposing we play drive-through restaurant, followed by a drive-in movie. I could have made more of an effort to set a better example of fast food, but I let the kids take the lead. The menu: dinosaur chicken nuggets, sweet potato fries, orange-carrot salad, and strawberry shakes. I lobbied for a more creative logo on the paper bags, but my 6-year-old insisted on these:

    100430_CPE_bags2

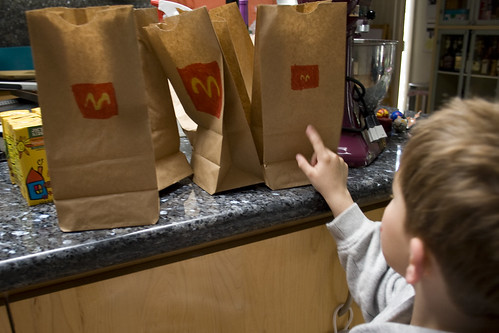
    His 3-year-old brother helped by scribbling on another paper bag that he taped to the cabinet as the speaker. At dinner time, the kids lined up behind the speaker and placed their orders. I played the part of the slightly surly restaurant worker, and Anna and I filled the bags, wrapping fries in waxed paper and tucking in a few stickers as treats. Strawberry shakes proved too ambitious, so we included whole strawberries and boxes of lemonade.

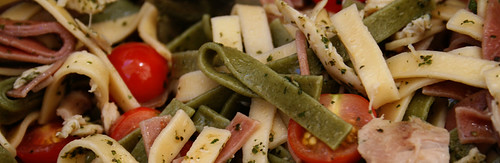
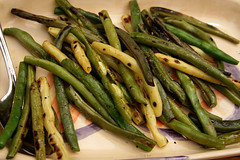
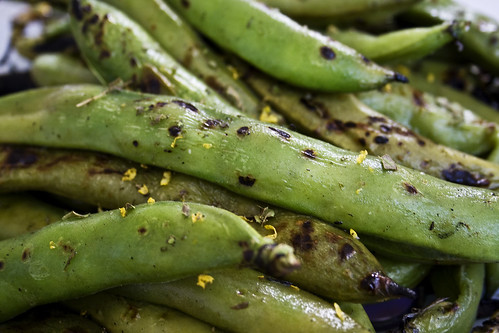
    Playing drive-through is a great way to shake up routine, and the kids had a blast. As they settled into the living room for the drive-in movie -- shown on the big screen with a projector -- I grilled fava beans and burgers for the grownups.

    It's a tough crowd for burgers: Most of us have been doing serious work on improving our diets due to cholesterol concerns and creeping weight gain. I chucked my old burger recipe out the window and started over from scratch. I built this version around organic, grass-fed beef I'm lucky to be able to get for a decent price at a local farmer's market. Grass-fed beef is lower in fat and calories than grain-fed beef, and much richer in nutrients and omega-3 fatty acids. And it tastes fantastic. It still isn't health food, but it's a very good choice if you eat beef. I don't want to be a meat snob, but get your hands on some if you can.

    I mixed the beef with an equal amount of ground turkey and added marjoram to infuse it with savory flavor. Meaty, savory, and satisfying.

    Drive-Through Burgers

    You could stretch this to make eight burgers, but they'll be small after they shrink. I know this, because that's what I did.

    1 pound ground beef, preferably grass-fed
    1 pound ground turkey
    2 teaspoons Worcestershire sauce
    1 1/2 tablespoons freshly chopped marjoram (can substitute other herbs, such as sage, thyme, or rosemary)
    freshly ground pepper
    six whole-wheat hamburger buns

    Put ground beef and turkey in a large bowl. Sprinkle Worcestershire sauce and marjoram over meat and then combine gently. Handle the mixture minimally -- just enough to evenly blend it together. Divide meat mixture into six equal parts and gently shape into patties. Press a dimple in the middle of each one to keep it from bulging in the center as the meat shrinks.

    Grill patties according to your preference. We cooked them for 3-4 minutes on each side over medium heat, until they were just past medium-rare. If using cheese, top burgers with cheese in the last minute or so on the grill. Serve on whole wheat buns and top with your favorite condiments.


    Sweet Potato Fries

    I like these with the skins on, but you can peel them if you like. Play with the seasonings to suit your taste -- these are relatively mild, in deference to the kids.

    4 medium sweet potatoes
    2 tablespoons olive oil
    1/2 teaspoon garlic powder
    1/2 teaspoon cumin
    1/8 teaspoon allspice
    kosher salt and freshly ground pepper, to taste

    Preheat oven to 500 degrees. Grease two baking pans lightly with olive oil.

    Scrub potatoes very well and slice into fries about 1/4-inch thick. Combine the remaining ingredients -- oil through salt and pepper -- in a large bowl and add potatoes, tossing well to coat. Spread potatoes in a single layer on prepared baking sheets. Bake for 25 to 35 minutes, shaking the pan occasionally and turning potatoes once or twice, until potatoes are browned and crisp.

    LinkWithin

    Related Posts Plugin for WordPress, Blogger...