Tuesday, October 30, 2012

Spider Cupcakes


Happy Halloween!
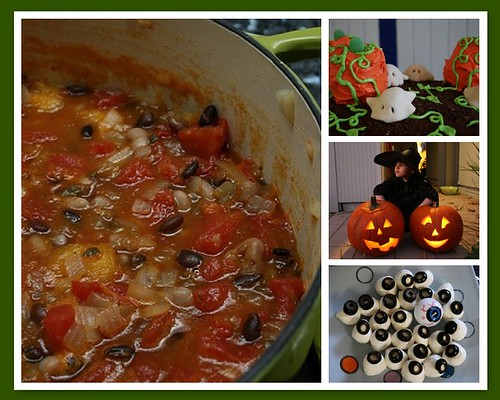
Those spook-tacular spider cakes are our favorite treat this year. They are dairy-free, egg-free, and very delicious. Kids had a great time decorating them and making their own versions of spiders, with different choices of colors and ingredients.

I found this recipe for the cupcake a couple years ago, when confronted with the many food allergies at school, and I tested it many times. It can be found here at one of my favorite DIY websites:

Best Chocolate Cake Ever (and it happens to be vegan) 

It's amazing and its light texture is ideally what we want for a cupcake. Also I've been working on ideas for healthier cake decorations and frosting ideas for years, and this was a great opportunity to use some of them.

The decorations were our choices of natural-colored candies and fruit leather, and, as you can see in this wonderful retro-like photo, taken by Darienne, even some cereal and white chocolate. That means they're still attractive and edible after the eyes and spider legs are devoured by our little monsters.

If you want to trick your friends and kids with a vegan alternative that tastes as good as a regular one, this is your treat to try!  Enjoy.


Healthy Spider Decorations
Trader Joe's and Whole Foods carry lots of no-artificial colors candies that can be used here. Our choice for fruit leather was TJ's boysenberry, but any other will work.
6 fruit leather bars
1 cup cereal (Cheerios, Joe's O's)
1 box coated sunflower seeds (these have a bit of milk chocolate, so they should be avoided if choosing a strictly vegan cupcake) or tiny pieces of strawberry for fangs and dry rasperry bits for eyes
white chocolate chips
children's scissors

Invite kids to cut the legs and create their own spider face with the decorations. Use the chocolate glaze printed with the original recipe like a glue, while it's still warm. Let cakes dry a bit (if you have time), and serve them on a web of treats...

Wednesday, October 24, 2012

1 1/2 Apples Pancakes


While it's all about the omnipresent pumpkin, this month and beyond, we were also thinking about one precious gift from the season: Apples.
We tested this recipe with kindergartners of our first session of the Cooking Club at school, and it was a hit. Not just because they were having fun chopping apples and mixing ingredients, but also because they just loved the book that went along with the recipe: Amelia Bedelia's First Apple Pie, by Herman Parish, illustrated by Lynne Avril. The cute story also brings a recipe, but we had to decide for something simpler and faster, something almost like a pancake. Like this book suggests, it's always important to be flexible, and kids were happy enough to try something different, but also something they made. Just like the hilarious and sweet Amelia Bedelia!


Apple Quick Cakes
This recipe was adapted from the New York Times recipe, Apple Griddle Cakes. I mostly substituted some ingredients to make it possible for all kids to taste it. It became vegan, and also safe for kids allergic to eggs and dairy.

1 cup white whole wheat flour
3 tablespoons brown sugar
2 teaspoons baking powder
3/4 cups vanilla soy milk
2 tablespoons canola oil
1 tablespoon flax seed meal mixed with 3 tablespoons water
1 granny smith apple, diced in small pieces
1/2 Gala,  Fuji or Gravenstein apple, also cut in to small pieces
Cinnamon (optional)
Powdered sugar, for dusting

Heat a electric griddle, or skillet, to medium heat (350 F). In a large bowl mix dry ingredients, and whisk to mix them all. Add pieces of apple to coat them with mix. In another bowl mix wet ingredients and whisk. Pour the wet mix on the dry ingredients bowl.  Stir with a wooden spatula up to when is mixed. Batter should be thick, enough to be scooped to the griddle. Brush or spray vegetable oil to the hot surface and scoop batter. Flip after about 3 minutes or when surface is already showing signs of becoming golden. Allow other 3 minutes for the other side. Enjoy with powdered sugar, maple syrup or vanilla ice cream on top. 

Monday, October 22, 2012

3 ways to enjoy pumpkin for dinner

We're surrounded by sweet pumpkin treats this season — store shelves seem to get a little crazier every year. Take a break from pumpkin pie and try making pumpkin part of the main event with these vegetarian recipes for pumpkin chili, tortillas, and tostadas.

Pumpkin Chipotle Chili

We dished this up for a Halloween party a few years back — my only photo of it is squashed with shots of other treats at the party, so you get the whole thing. But it was the chili that has been repeated year after year... It calls for roasting a pumpkin rather than opening a can, which is hardly any work at all. Your home will smell delicious. Trust me.

Halloween09 mosaic


Pumpkin Tostadas with Black Beans

This one was a flop with the kids, I confess. My kids aren't eating beans, cheese, vegetables, tortillas, or sauces these days, so it isn't a big surprise. Some day, however, they'll realize what they're missing. This fast meal can be made with canned pumpkin and beans and jarred salsa — or you can prep it all from scratch. Your choice. If you're feeling really fancy, add in some fried sage leaves. Yum.


Pumpkin Tortillas

I usually buy tortillas at the store. Every time I do, I wish I had taken the minimal time to make tortillas from scratch. It really isn't that difficult, but it's hard to pull it together on a week night. These gorgeous,  saffron-hued tortillas last a week in the refrigerator, or even longer in the freezer. Use them to give everyday quesadillas a flavorful boost, or use them to add depth to the Pumpkin Tostadas above.

Sunday, October 14, 2012

4 fast and sweet treats for Halloween


These treats take mere seconds to make and are easy projects for children — or busy parents looking to slip something fun into a lunch box. Added bonus: All but one involve healthy, whole foods.


Lunch Box Pumpkins

Clementine + Sharpie permanent marker = super fun fruit in seconds! Pile 'em up on a plate and you have a pumpkin patch centerpiece.


Spooky Bananas

Gently scratch writing on a banana peel. At first it's invisible ... but the writing gradually appears over the next hour. (This one's courtesy of Cute Food for Kids.)


Marshmallow Ghosts

These require slightly more specialized equipment: edible markers, such as Food Writer pens from Wilton. Just draw a spooky face on a marshmallow. Boo!


Eyeball & Ghost Eggs

You can use a Sharpie or an edible marker for these. Aren't they gruesome?!

Monday, October 8, 2012

3 perfect pumpkin treats

This is one of our favorite times of year. Predictably, as the days grow cooler and shorter we find ourselves drawn to pumpkin ... but not always in predictable ways. Here are three sweetly surprising ways to enjoy pumpkin:


Pumpkin Coconut Scones

Coconut adds a Brazilian note to these hearty, spice-infused scones made with a blend of white and whole wheat flour. What a beautiful way to start a fall morning!


Whipped Pumpkin Cream Cheese

I swear people stalk the refrigerated shelves at my local Trader Joe's, snapping up the seasonal pumpkin cream cheese as soon as it's stocked. I kept finding myself disappointed and out of luck — so I worked up this homemade version. It's a less expensive, a little lighter, and I can have as much as I want whenever I want it.


Pumpkin Pudding

Cranberry makes another appearance here — this time, at the center of a unique, velvety pumpkin pudding. Let it set in a beautiful mold and you'll have a standout dessert for a Halloween party or seasonal table.


Thursday, October 4, 2012

Shrunken heads

121002_CPE_shrunken-heads_1


I think we called these apple dolls when I was little, but shrunken heads is so much more appropriate, don't you think? We've had these ghoulish heads impaled on stakes in a flowerpot on our counter for the past two weeks. I rather like them this way, but the kids want to give them mummified bodies.

The finished apples are leathery, soft enough that you can use a needle and thread to sew in a hanger. When I was a girl, we fashioned hangers out of paper clips and stuck those in when we carved the apples. If you remove the core, you can stick the dried apple atop a bottle, then decorate the bottle as a body. Or you could just leave them impaled on sticks — you know, as a warning to the other apples.

120919_CPE-apples-before
The before picture

These are so easy and fun to create with kids, and they make perfect Halloween decorations. We used pointy pencils to scratch out the features, then I carved them with a small jackknife. The kids checked them daily, checking out how the texture changed as the moisture evaporated.

Apple heads can take as long as three weeks to dry, so don't wait until the last minute! I hear they can last for years, but I can't personally vouch for that — yet.

When they're done, you can even sew or glue on yarn for hair and decorate them however you wish.

121002_CPE_shrunken-heads_2


Shrunken heads

apples
1/2 cup lemon juice
1/4 cup salt
2 to 3 cups water

Combine lemon juice, salt, and water in a bowl and set aside.

To make each head, first peel the apple (no need to remove the core, unless you want to fit the finished apple on a bottle) and soak it in the bowl of lemony salt water for a minute or so.

Draw features on the apple with a pointy tool — a toothpick, a small skewer, a paring knife. Kids can use a pointy pencil. Then use a paring knife or other small tool to carve out the features. Remember: It will shrink, so keep it simple and don't fuss over details. If you like, insert whole cloves into the eyes or dried rice as teeth.

Soak the carved apple in the lemony salt water and soak for a few minutes. Remove it, pat it dry, and decide how you're going to let it dry. You can set it on a wire rack, stick it on a skewer, fashion a paper clip hanger — just don't set it on a plate or it will get moldy fast. It will take one to three weeks for your apple head to dry.

To kick-start the process, put your freshly cut apple in the oven at a low temperature — no more than 175 degrees — for an hour or two.

Keep an eye on your apple: If mold starts to form, gently scrape it away. You also can spritz it with a weak bleach solution.

121002_CPE_shrunken-heads_3

LinkWithin

Related Posts Plugin for WordPress, Blogger...