Sunday, February 24, 2013

The Calcium, the Kale, and a Recipe

My mother just left. And there I was, alone, left with a full bottle of calcium tablets, a bunch of kale and some questions.

But before you start thinking that I am going nuts, there's the whole story: My mom who lives in Rio stayed with us for almost 2 weeks and was very assertive on recommending that I should start considering taking daily calcium supplements to avoid bone loss. Her argument was indisputable:  She echoed my family doctor's advice. Immediately I found an unopened bottle of calcium with vitamin D -the one I bought after the doctor's office July 2012 -  in the pantry and started gobbling three pills a day. Later, I just found an article and another  showing new studies, and suggesting that calcium should be better eaten in food, and not just in supplements or milk. Another article, a bit older was celebrating the wonders of kale.

Three days after her depart, my worries were immediately transferred to my children's diet.  My immediate question was if their daily intake of calcium is satisfactory. After some research, I found out that they are probably not. They don't find it pleasant to drink the recommended 3 to 4 servings of milk - or almond or soy milk-  per day, plus some other calcium rich foods. Because they are not so happy about drinking their calcium, I now will add to my daily improvised menu some of the foods that might add what is missing: always some Swiss cheese (a slice has the daily 30% Calcium!) inside a sandwich, more yogurt (check this amazing way of making it at home!) in the house, but mainly adding  more calcium loaded non-dairy ingredients to our meals: Kale, spinach, almonds, oranges and broccoli.
Thanks mom for the good advice. And here a last minute recipe full of calcium!


Kale, Spinach and Cheese Gratin
This is a very loaded calcium food, and for my surprise both boys ate all their portion of gratin last night at dinner. 

2 tablespoons Earth Balance vegetable spread
2 tablespoons all purpose non-bleached  flour
1 cup 2% milk
2 cups kale, chopped
1 cup spinach
Kosher salt, to taste
2 slices swiss cheese

In a flame and oven proof skillet or small casserole melt vegetable spread and add flour, making a paste (roux). Add milk and stir continuously to make the béchamel sauce. Toss kale and spinach, mix, and sprinkle some salt. Cover with Swiss cheese and transfer to a 350 F pre heated oven. Bake for about 15 minutes. Open oven and stir vegetables and béchamel. Bake for 5 minutes more and serve. Yum!

Wednesday, February 20, 2013

Black bean hummus, two ways

130209_CPE_black-bean-hummus


I love hummus. I love it with raw veggies, I love it spread on sandwiches, I love it with chips, I love it straight off a spoon.

And I love garbanzo beans, which usually provide the creamy base for hummus. But we've been enjoying garbanzos as a meal with increasing frequency (as in this delicious slow cooker dinner, or a version of this easy warm salad for lunch), and I don't want to see them yet again at snack time. Not even puréed.

Black bean hummus, however, is a completely different dip.

After toying with a few variations, I've settled on these two favorites. The first is bright and fresh, infused with oranges. The second is bolder and spicier, and just as delicious.

I prefer my hummus without olive oil. If you find it too thick for your liking, add more water or juice, or a bit of olive oil. If you have citrus salt, use it here.

Orange Citrus Black Bean Hummus

If you have citrus salt, use it here.

1 1/2 cups cooked black beans
2 tablespoons orange juice
grated zest from 1 orange
1 tablespoon tahini
1/2 teaspoon salt
1/2 teaspoon cumin

Combine all ingredients in a food processor and blend until smooth.

Paprika-Lime Black Bean Hummus

1 1/2 cups cooked black beans
2 tablespoons reserved bean liquid
1 1/2 tablespoons lime juice
1-2 cloves garlic
1 tablespoon tahini
1/2 teaspoon salt
1/2 teaspoon cumin
1/4 teaspoon smoked paprika

Combine all ingredients in a food processor and blend until smooth. If you like it spicy, add a few drops of Sriracha.

Saturday, February 16, 2013

Snack attack


Here's something I realized recently: My two boys, who are portrayed by the youngest in this little design above, are apparently genetically programmed to be skinny. They are always complaining that there's very little time to eat their snack at school. By midmorning they are very hungry, and it looks that they need extra fuel. It's also a time when they would be rather playing than eating.

As I tried to use every opportunity to give them something healthy to eat, other than empty nutrition calories, I decided to go with the idea of packing lots of nutrition into one small snack.

And it's working. Their level of energy is increasing and I don't have to be concerned about them not eating well. By lunch time they are not so furiously hungry, and are able to enjoy some fruit and a very healthy sandwich packed with protein and vegetables.

Here are some nutrition-packed recipes and ideas I've been working with, with some success:

Little Monsters Granola Bars
Make a batch and pack them for one day of the week. Boys developed a label for them. Sweet brothers : )

Flax Seed Banana Bread
I use this recipe and I top the bread with pecans or walnuts, and sometimes homemade granola.

Reindeer Cookies
You can always add more to it. It will even hold some bananas and even more nuts or dry fruits.

Homemade Hummus
Besides what the original recipe suggest, I also add some pine nuts for extra nutrition.

Spring Pea Spread
Darienne's recipe is good-looking and it goes well with toasted whole grain bread.

Banana Bon Bons
This recipe is foolproof and kids always give ravewww.cook reviews about it when we use it to the Cooking Club.

Whole Wheat Ginger Scones
Some kids love the ginger in it. A great recipe by Darienne.


Wednesday, February 13, 2013

Sweets for your Valentine sweets

This is a busy week of holiday treats at my house! We try to acknowledge a wide range of holidays, and so far we've ushered in the Year of the Serpent on Sunday with long noodles and mandarin oranges, and Mardi Gras with a delicious king cake. My third-grader just read a book about Purim and is asking if we can try hamantaschen next week — and I still haven't decided how to mark Valentine's Day. Berry-filled meringues? Homemade truffles? Brigadeiros? Bonbons?

They sound fancy, but they're terrific choices when time — and energy — are in short supply. These sweets score big points for drama and presentation without much effort. They can be pulled together with a few ingredients you're likely to have on hand.

First up: Rose Meringue Clouds, lightly sweetened edible baskets filled with fruit. This version calls for rosewater, but you can substitute almost any flavor extract you like. They don't take much hands-on time, but they do spend up to two hours in the oven. If you don't have fresh berries, grab frozen fruit from the freezer.

1106_meringue


If chocolate's more your thing, go for truffles: Melt cream and chocolate together, add extra flavoring if you want, chill, and roll into truffles. We've featured lemon chamomile, lavender, and rose variations, but even plain ganache truffles are swoon-worthy. Try a dash of peppermint or orange extract for something less exotic. Invite the kids to join you as chocolatiers!

IMG_6015


Brigadeiros have been a favorite of ours since Anna introduced them to us at a birthday party. Condensed milk + chocolate = addictive little candies! These take a few minutes on the stove plus rolling them by hand. It's messy, sticky work, but someone has to do it. And then lick their fingers. Another great one for kids, but be prepared — they're likely to eat half of it in the process.


If you love chocolate and don't mind mess, enlist the kids to make Fleur de Sel Bonbons. You can manage a version of these with just a bag of chocolate chips, but you do need a candy mold. These will beat anything you might get in a heart-shaped box at the store, because the kids will have these themselves.

Monday, February 11, 2013

Mardi Gras king cake

130209_CPE_king cake_13


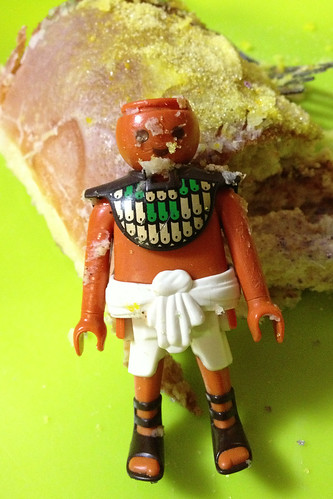
Tomorrow is Fat Tuesday, the festive end to the Mardi Gras season, kicking off the start of Lent. My 8-year-old is our household's Mardi Gras king this year: He found the plastic Egyptian soldier in our king cake! The prize trinket is typically a plastic baby, but I keep forgetting to procure plastic babies — last year the trinket was another Playmobil soldier.

In the southeastern U.S. king cakes are a treat throughout the season. Whomever finds the baby or other trinket in their slice is named king or queen for the day, and may have to host the party or bring the cake next year.

I confess, I've never had authentic king cake. I've made it twice in two years, and that's the extent of my experience. People have strong opinions about their king cakes, and this is just one version. A delicious version: my cake-averse child inhaled it and my guests wanted leftovers.

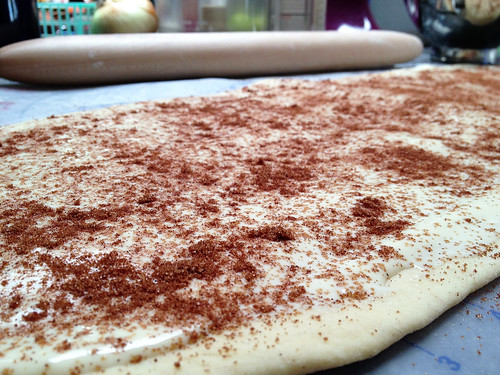
It's a slightly sweet yeast bread rolled up with a tangy cream cheese and cinnamon filling, then glazed
and decorated with colored sugar. Crunchy topping aside, it's more like a breakfast pastry than what you expect from a cake. Enough so, at least, that I let my kids have seconds for Sunday breakfast.

130209_CPE_king cake_11

This one takes just over 2 hours to make from start to finish, but most of that is rising time. If you use a mixer to knead the dough, it isn't much work at all. The hardest part is joining the roll of dough into a ring. Mine came out a little wonky on one side, but it doesn't matter. Kids can help with any part of this — except, perhaps, hiding the trinket!

The baby (or Egyptian soldier or whatever) goes into the cake after baking. You can slip it in through the bottom of the cake. Do be careful with choking hazards: Our Playmobil figures are a little big, but I don't have to worry about anyone swallowing it. Lego toys, for example, are out of the question.

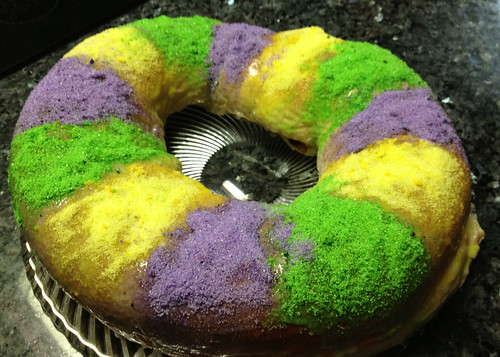
Our cake this year is bright but tame compared with last year's happily lurid version. We went with untinted frosting and let the colored sugar take central stage. Last year, we used colored icing and colored sugar for a much bolder look. And if you've seen many king cakes, you know bolder is better.

If your family isn't familiar with Mardi Gras celebrations, National Geographic has a few G-rated videos (trust me, do not just search for "Mardi Gras New Orleans" on YouTube). We liked this one on Mardi Gras after Hurricane Katrina and Carnival around the world, and this one that explains a little about preparation for Mardi Gras, including king cakes.

130209_CPE_king cake_14

King cake

Adapted from Food.com. If you don't have a baby figurine, substitute another small toy or even something edible, like a large bean or nut.

Dough
2 tablespoons butter
8 ounces light sour cream or Greek yogurt
3 tablespoons sugar
1 teaspoon salt
1 envelope yeast (2 1/4 teaspoons)
1 teaspoon sugar
1/4 cup warm water
1 egg
1 tablespoon cinnamon
3 1/4 cups cake flour (see tips below) or all-purpose flour

Filling
8 ounces light cream cheese, softened
1 egg white, lightly beaten with a fork
1/4 cup white sugar
1/8 teaspoon salt
1 teaspoon vanilla
2 tablespoons brown sugar
1 teaspoon cinnamon

Frosting and decorations
1 1/2 cups powdered sugar, sifted
1 to 3 tablespoons orange juice
yellow, green, and purple food coloring (optional)
yellow, green, and purple sugar (or make your own, see tips below)
small plastic baby or other figurine

In a small saucepan over low heat, combine butter, sour cream, 3 tablespoons sugar, and salt just until butter melts. Remove from heat and set aside to cool.

In a large mixing bowl, combine yeast, 1 teaspoon sugar, and warm water and let sit for 5 minutes. Add the melted butter mixture, the egg, 1/2 cup of flour, and the cinnamon and beat 1-2 minutes until smooth. Gradually stir in the remaining flour. Knead the dough in the mixer or by hand on a floured board until smooth and elastic.

Set dough in a lightly oiled bowl, turning to coat, and cover with plastic wrap or a towel. Let rise for an hour, or until doubled in size.

While dough rises, make the filling: Combine the cream cheese, egg white, white sugar, salt, and vanilla in a bowl and mix until smooth. In a small bowl, stir together the brown sugar and cinnamon.

Punch down dough and roll out to 10- by 28-inch rectangle. Spread the cream cheese over the dough, and sprinkle with cinnamon brown sugar. Roll up dough starting with the long side to make a long roll and pinch the edges to seal closed.

130209_CPE_king cake_12
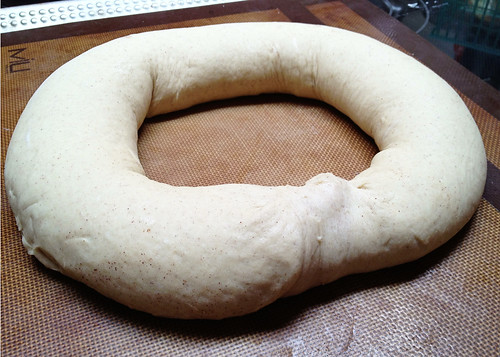
Oil a baking sheet or cover it with parchment paper or silicone mat. Transfer the roll to the baking sheet and form it into a circle, pinching the short ends together. Cover and let rise 45 minutes.

Preheat oven to 375 degrees. After cake has risen, bake it for 15-20 minutes. Check on it after 15 minutes — if it's browning but needs to bake longer, cover it loosely with foil.

As cake cools, make the glaze: Stir orange juice into powdered sugar, a spoonful at a time, until you get the consistency you want. Tint the glaze with food coloring if you wish. Spread glaze over cake and sprinkle on colored sugar.

Don't forget the baby! Carefully lift up the edge of the cake and insert the figurine into the cake from the bottom. Laissez le bons temps rouler!

Tips:
Cake flour: This makes a light, soft cake, and it's easy to make your own substitute. Scoop 2 tablespoons of cornstarch into a measuring cup and then fill with regular flour to make one cup of substitute cake flour — be sure to sift it well.
Colored sugar: To make your own, put 1/4 cup of sugar into each of three plastic, zip-top bags. Add a drop or two of food coloring in each bag, seal, and shake vigorously until the color is evenly distributed.

Sunday, February 10, 2013

Three Berries Valentines Ice Cream


If you are looking for an awesome-looking dessert for this Valentine's season (yes, I call it season, as we usually start talking about it least two weeks before the day), here's a good one. You can write your valentine's message on top of it and erase it with the bottom of a spoon, so to re-write your love again.

I prepared it with third-graders at school on Friday and the reviews were passionate: "Oh, it was looking yuk and now how beautiful this is," said an animated girl, going for her second serving. Others were puzzled about how easy ice cream making is and how beautiful the color of the mix of three berries was. Some girls were dressed in the same color and so proud about their choice for the day...

We puréed the fruit compote together, and stirred the condensed milk in turns. The ice cream maker did the rest. Our class was mainly about freezing, as I go more with the science of cooking for the older children, while my other son and his friends in first grade are more into the adventures of cooking.

If you are looking for more ideas for a full meal with your Valentines, here are some from our kitchen:

Bella Note Red Sauce
Pasta with Passion Sauce
Strawberry Spinach Salad

Three Berries Valentines Ice Cream

The ideal is to prepare the fruit compote the day before making it in the ice cream maker.

2 cups fresh strawberries, stems removed, halved
1 cup blackberries
1 cup blueberries
1 cup apple juice, unsweetened
1 envelope agar agar or unflavored gelatin
1 can sweetened condensed milk

Combine the fruits and apple juice in a heavy-bottomed pan and bring to a boil. Simmer for about 30 minutes, half-covered with a lid. Sprinkle gelatin on top and let sit a few minutes, then mix it in and let it cool down. Transfer to the freezer. After about 6 hours, remove and blend it (I used a hand blender) with the condensed milk.

Transfer the mixture to an ice cream maker and follow your maker's indicated time for a creamy and firm texture. Mine took about 25 minutes.

Another option is to transfer the mix to fancy cups and freeze it for up to 2 hours, enough to be able to write your message on it!

Friday, February 8, 2013

Valentine inspiration

I always look forward to making valentines with my kids — until we're a quarter of the way done and I remember my kids don't like glitter and glue nearly as much as I do.

We're starting on our collective 50-plus valentines this weekend. If you're looking for some inspiration, I rounded up some of my favorite simple, boy-friendly designs on Pinterest — click on over to check them out.


Two of my favorites:

Lines Across showcases a simple stamp made with craft foam strips for creating cross-hatch designs. It's a brilliant way to quickly decorate a lot of paper real estate. And it's versatile — when you're done with valentines, put it to work on other projects. Love the whale she features in the same post.

And this lovely template at Inchmark is a sweet way to encourage kids to make thoughtful valentines without a lot of work: Use a line-drawing portrait template kids can customize for each friend.

See all my favorites at Pinterest!


Wednesday, February 6, 2013

Vote for us in the Parents magazine awards!

We’re honored and delighted today to share some big news: Cook Play Explore has been nominated as one of the best blogs of the year at Parents magazine!

We’re especially humbled to find ourselves in such excellent company vying for top honors among blogs “Most Likely to Help You Achieve a Personal Goal.”

Thank you for reading along and sharing in our successes, experiments, and challenges. We’d appreciate your support over at Parents magazine this month, where you can vote once a day, every day, through Feb. 24. If you enjoy what you see here, click here to cast a vote for Cook Play Explore:

Parents Blog Award Finalist

(If you've had trouble voting with your mobile device, the link should work properly now!)

Be sure to check out all the nominees this year. I've discovered some fantastic blogs through these awards in the past (that's how I found the charming Made by Joel and the delicious Annie's Eats).

We are especially happy with our category. When new acquaintances ask about the blog, Anna and I usually fall back on the simplest explanation: It’s about preparing and enjoying food with the whole family.

But we really are about more than that, and we’re so glad we resonate with readers as a motivational resource. We aren’t — and never will be! — super moms, but we’re always trying to find ways to do a little better.

We write about our own goals: to coax children to try new tastes, to serve healthier fare, to preserve our sanity in the kitchen, to seize opportunities to turn ordinary dishes into something extraordinary, and especially to nurture playfulness in the kitchen. Thanks for joining us!

LinkWithin

Related Posts Plugin for WordPress, Blogger...