Monday, October 31, 2011

Succotash in Squash


The sight of those beautiful acorn and carnival squashes inspired me to think about something beyond sugar and cinnamon treats. It made me think about something good to be served not just for a Halloween dinner, but also good for Thanksgiving menu.

And then everything came to make sense: a Native North American classic inside a deliciously edible seasonal container.

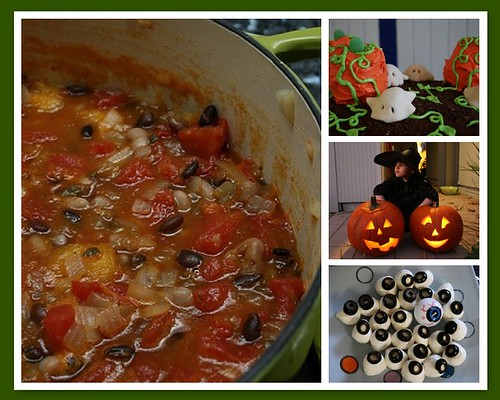
One of my kids was not happy when he saw the "dead" acorn squash, halved and cooked, in front of him — it used to be one of his favorite good-looking squashes in his "pumpkin patch" on the rug. But soon he was convinced that the squash's fate was good, and ate all of his succotash.

As you might know, succotash can be interpreted in many ways as long as corn and white beans are included to the recipe. I mainly played with seasonings to enhance the sweetness of the corn and squash while adding a bit of a European flavor with thyme and shallots.

Succotash in Squash

Bake the squash while preparing the beans. It's a good idea to bake a whole batch of squash and sugar pumpkin to use in other recipes and freeze for later.

1 carnival squash, halved and de-seeded
1 acorn squash, halved and de-seeded
1/2 pound lima or cannellini beans, soaked overnight and cooked al dente in salty water
1/2 pound yellow corn kernels, cooked
2 tablespoons extra virgin olive oil
4 bay leaves
1 medium shallot, diced
4 garlic cloves, smashed
1/2 cup cooked sugar pumpkin
1/2 cup tomato sauce
2 teaspoons thyme
kosher salt to taste
cayenne pepper, to taste
poppy seeds, to sprinkle over the top of each squash

Bake squash halves, face-down in a baking pan with a half-inch of water, at 375 F for about one hour. You want them firm, so check after 45 minutes to see if they're ready — avoid overcooking.

While squashes are in the oven, prepare the filling. Shallow-fry shallots and garlic in olive oil over medium heat. Add thyme and tomato sauce and simmer for 10 minutes. Then add beans and sugar pumpkin and stir. Add salt to taste, and simmer for about 20 minutes. Serve beans inside the baked squash. Happy eating!

Saturday, October 29, 2011

Spooky Bananas


Have you tried magic writing on bananas yet? This is a perfect time to try it. Using a toothpick, gently write your message on the banana peel. Within an hour, the letters will grow dark and clear. To "color in" a drawing, use a blunt toothpick or another dull tool to press on the peel, without breaking the surface.

It's a great surprise for the fruit bowl or the lunchbox — kids love it!


Thursday, October 27, 2011

Eyeball Eggs


I first made these as a teenager: I drew eyes on a dozen eggs, put the carton back in the fridge, and waited for my mom's reaction. She never said a word. (I think she might have been a little exasperated with me at the time.)

If eyeballs aren't your thing, you could make ghosts:


I made these eyes with washable markers, so I could rinse away the ink before cracking them open, and used a bolder Sharpie for the ghost. Decorate a hard-cooked egg and tuck it into a lunchbox — or leave a surprise in the egg carton for the next person to make an omelet. Boo!

Tuesday, October 25, 2011

Pumpkin Coconut Scone


Pumpkin and coconut are considered a classic combination for traditional preserves and compotes in Brazil. Halloween time here sends me me back to those memories of sweetness — pumpkins are everywhere. My kids, for instance, are organizing their own pumpkin patch on a rug in the living room, made with the pumpkins they bring home from field trips... and although we don't celebrate Halloween there as we do here, the thought of candy associated with pumpkins just helped me to rescue that taste.

But before I started to transform the small jack-O-lanterns-to-be in the house into an exotic compote (that just my grandma was able to prepare), I spent my time trying to find a way to blend the coconut reference into a classic recipe. The result was a hearty and perfumed baked goodie, ideal to be accompanied by Darienne's Whipped Pumpkin Cream Cheese.

Pumpkin Coconut Scones

This recipe is freely adapted from King Arthur's Flour Harvest Pumpkin Scone. The original recipe shares a smart tip: Freezing the dough for 30 minutes before baking will make that delicious crunchy upper crust  happen. If you want to make them more Hallowee-ney, decorate them with Darienne's royal icing eyes, or drizzle with sugar icing. 

2 cups all-purpose flour
1 cup white whole-wheat flour
1/2 cup organic turbinado sugar
1 tablespoon baking powder
1 teaspoon kosher salt
2 teaspoons ground cinnamon
1/2 teaspoon ground nutmeg
1/2 teaspoon ground allspice
1 teaspoon ground pumpkin pie spice
1/2 cups unsweetened desiccated shredded coconut
1/2 cup canola spread (Earth's Balance is my favorite), or butter
1 cup organic, canned pumpkin or cooked sugar pumpkin
2  large eggs (or if substituting, 2 tablespoons flax seed meal diluted in 6 tablespoons of water, as suggested by Bob's Red Mill)

Mix all dry ingredients in a big bowl. In another bowl, whisk eggs (or flax substitute) and mix with pumpkin.

Cut butter or canola oil spread in the flour mix to make a coarse mix. Add pumpkin mix gradually to the mixed flour and butter with the help of a wooden spoon. Knead a little bit, if necessary, to hold the dough together.

Pat dough into two pie-shaped discs and transfer them to a cookie sheet covered with parchment paper. Cut them into 8 slices each and brush them with milk or milk substitute.

Preheat oven to 425F. Put the pies in the freezer, uncovered, for ideally half an hour.

Sprinkle wedges with sugar and cinnamon and bake for about 25 minutes or until scones are golden brown, making sure that all is baked to perfection. Remove from the oven and serve while still warm. 

Monday, October 24, 2011

Whipped Pumpkin Cream Cheese

We're addicted to Trader Joe's Pumpkin Cream Cheese. My older son tried it late in the season last year and turned to me, eyes huge: "I. Love. This!" It recently returned to store shelves for a second year, and now my younger son — the one who doesn't like cream cheese — is loving it too. We're happy it's back, but what will we do when it disappears from the stores again? The answer, of course: Make our own.

If you have a TJ's near you, definitely seek out this spread. But if you don't, or if you want a version with less fat or less sugar, or it's April and you're craving pumpkin cream cheese, whip this up. I'm comfortable with the amount of sugar here, but you probably can reduce it by another tablespoon or two.

It's delicious on bagels, but don't stop there — this spread is wonderful on celery ribs, quick breads, scones, and fresh warm bread, and as a dip with apple and pear slices or cookies.

We served it as a dip with baked cinnamon chips, made from homemade pumpkin tortillas cut into bat shapes. (Cut tortillas into triangles or into shapes with cookie cutters, brush with melted butter, sprinkle with cinnamon sugar, and bake at 350 degrees for about 10 minutes or until crisp.)


Whipped Pumpkin Cream Cheese

If you wish, substitute regular cream cheese or whole milk for the lower-fat equivalents and use prepared pumpkin pie spice instead of the individual spices. This doesn't have the shelf life of a store-bought blend — if you don't plan to use it up within a couple days, make a smaller batch.

8 ounces reduced-fat cream cheese, at room temperature
1/2 cup pumpkin pureé
1/4 cup brown sugar
1/2 teaspoon vanilla extract
1/2 teaspoon cinnamon
1/2 teaspoon allspice
1/2 teaspoon nutmeg
1/4 teaspoon cloves
1/4 teaspoon ginger
1 to 2 tablespoons low-fat milk (optional, for thinner spread)

Combine cream cheese through spices in a mixing bowl. Using a stand mixer with a whisk attachment, blend for a few minutes until light. Gradually add milk, if desired, and continue to beat until light and fluffy. You're not going for the texture of whipped cream, just lightening up the cream cheese.

Chill for at least an hour before serving.

Sunday, October 23, 2011

Pumpkin Chipotle Chili

This vegetarian chili has become a perennial fall favorite in my home. It's a great make-ahead dish for parties, and leftovers freeze well for ready-to-go meals later. It's a fun way to get your children to look at pumpkins a new light. If you're feeling ambitious, present it in a hollowed out pumpkin—perhaps with a jack o'lantern face drawn on it with marker. Hearty and filling, this will help fuel your family through a night of Halloween haunting.
Halloween09 mosaic
My favorite chili, with other party classics — spooky pumpkin patch cake
and mozzarella-and-olive eyeballs.

Pumpkin Chipotle Chili

To roast a pumpkin, simply cut the pumpkin in half, scoop out the seeds, and pierce the shell a few times with a fork; set halves on a baking sheet, cut side down, and roast at 350 degrees for 45 to 90 minutes. The pumpkin's ready when you can easily pierce to the center with a fork. To keep this child-friendly, go easy on the chile—but offer chipotle chile powder for those who want to turn up the heat.

2 tablespoons olive oil
1 1/2 onions, chopped
4 garlic cloves, peeled and chopped
cooked flesh from 1 small Sugar Pie pumpkin, chopped (see note)
1 1/2 tablespoons chipotle chile in adobo sauce (more or less according to taste; see note)
1 28-ounce can of tomatoes
2 cups vegetable broth
2 cups cooked black beans
2 cups cooked white beans (cannelini, navy, etc.)
2 tablespoons fresh sage, chopped
salt, to taste
black pepper, to taste
toasted pumpkin seeds, for garnish (optional)

Heat oil in a Dutch oven or stock pot over medium heat. Sauté onion and garlic until softened. Add pumpkin and chile and sauté 2 minutes more. Add tomatoes, vegetable broth, beans, sage, and salt and pepper to taste. Simmer, covered, for 45 minutes. Serve topped with toasted pumpkin seeds, if desired.

Saturday, October 22, 2011

Marshmallow Ghosts


Like the clementine jack o'lanterns featured last week, these don't require a recipe — you just need marshmallows and an edible marker (such as Food Writer pens from Wilton). Draw a spooky face (I made ghosts and attempted Jack Skellington) and tuck them in lunchboxes.

You also could insert lollipop sticks and arrange them in a jar or vase — or in cakes — for a Halloween centerpiece. It's a great little project for kids, too!

Friday, October 21, 2011

Pumpkin-Flavored Tortillas


Yes, I admit, I go pumpkin-crazy in autumn. What's not to like?! Pumpkin is a nutritional superstar equally at home in savory and sweet dishes. Here, I used a bit of canned pumpkin to flavor the homemade tortilla recipe I shared a few weeks back. You can use the same approach to flavor your tortillas with spinach, tomato, red pepper and more — homemade flavored wraps, made to order!

Pumpkin gives these tortillas a gorgeous, saffron color. I enjoyed mine as quesadillas stuffed with smoky salsa, grilled chicken, and Monterey Jack cheese. If you really want to earn your Super Mom merit badge, cut pumpkin shapes with a cookie cutter and use those to make quesadillas. You also could use them to make tostadas with black beans.

As I noted in the original post on making tortillas, my recipe makes no claim to authenticity. But it's relatively low-fat, uses a healthy amount of whole wheat flour, and comes together easily. It's a little bit of effort, but so worth it!


Pumpkin Tortillas

Pumpkin tortillas make terrific quesadillas! These are a little stiffer than my plain tortillas. You might want to add a little more olive oil, or rub a few drops on your hands when you knead the dough.

1 cup all-purpose flour
1 cup white whole-wheat flour (or substitute all-purpose)
1 teaspoon baking powder
½ teaspoon salt
1 tablespoon olive or canola oil
1/4 cup pumpkin purée
warm water

Stir together flour, baking powder, and salt with your fingers or a fork. Drizzle the oil over the dry ingredients and blend well.

Measure pumpkin into a liquid measuring cup. Add warm water until the total volume is 3/4 cup. Purée with an immersion blender until the pumpkin is fully incorporated into the liquid.

Add the pumpkin and water mixture to the dry ingredients, a spoonful or two at a time, mix in, and repeat until the dough starts to come together in a shaggy ball. You might need a little more or a little less water.

Turn the dough out onto a lightly floured surface and knead for a few minutes until it’s smooth and elastic. Divide into 8 to 10 pieces and roll into balls—about the size of ping-pong balls.

Heat a skillet over medium heat. Roll a ball of dough out into a very thin circle, about 7 to 8 inches. If the dough is resisting, cover and let it rest for 10 to 20 minutes.

Put the rolled-out dough onto the heated skillet and cook for about 15 seconds; you should see some puffy spots and browning. Shake the skillet a little to slide the tortilla around if it gets too puffy. Flip every 15 to 20 seconds—it shouldn't take more than a minute or so.

Wrap cooked tortillas in a kitchen towel to keep them warm and soft, or store in a tortilla warmer while you cook the remaining tortillas. If you have leftovers, store them for up to a week in the refrigerator in a zip-top bag or airtight container, or in the freezer.

Variations: To make different flavors, substitute tomato paste, roasted red pepper, or spinach for the pumpkin. You may need more or less of those ingredients — experiment to suit your own taste. Just be sure to blend it thoroughly into the water so you have a total of 3/4 cup of liquid.

Thursday, October 20, 2011

Lunch Box Pumpkins


Turn a clementine into a jack o'lantern by drawing a face on the peel with a Sharpie. This time of year, our fruit bowl is piled high with these guys, who find their way into daily lunch boxes. We're bringing a few dozen to our preschool party too. Super easy, and super fun!

Wednesday, October 19, 2011

Spooky Candy Decorations


They're creepy and they're kooky, mysterious and spooky, they're all together ooky, they're royal icing eyes!

My 7-year-old has a stack of Halloween-inspired food books he pores over this time of year. I'm smitten with the candy eyes, but I've never spotted them in a store. Really, they're just like the Candy Buttons I loved when I was little ... and those are just like royal icing. Which is used to make candy eyes.

Make a stash of these candy eyes and you can add a bit of silliness — or ghostliness — to just about anything. Less than a half-hour's work yields a generous supply of long-lasting candies. They're perfect for decorating cookies, and they can add fun to to all sorts of food.

Dress up a small treat:

Add a little surprise to a wrapped candy:

Give fruit some personality:

Even use them on a sandwich:

Some royal icing recipes use egg whites. Don't risk salmonella: Use meringue powder instead. (Look for it in the baking aisle at the market or craft stores.) I stuck with simple black-and-white eyes, but by all means, tint them any color you want.

And don't stop with candy eyes! Draw simple shapes on waxed paper, flip the paper over, and follow your pattern when you pipe the icing. I made some ghosts and Jack Skellington faces for my younger son, who plans to be the Pumpkin King for Halloween. You also can use royal icing to decorate cookies, cement together a haunted gingerbread house, and even make sprinkles — see the tips following the recipe. (For non-Halloween candy dot fun, check out this great post inspired by Candy Buttons.)


Candy Decorations

You can use royal icing to pipe ghosts, bats, monster faces, fangs, pumpkins — whatever you can think of. If you want to flavor it, add a bit of clear extract along with the corn syrup. For color, use gel coloring.

2 tablespoons meringue powder
1/4 cup warm water
1/2 lb. powdered sugar, sifted
1/4 teaspoon light corn syrup

Combine the meringue powder and water in the work bowl of a stand mixer. Using the paddle attachment, beat on high speed until foamy.

Add the powdered sugar mix on low speed until combined. Add the corn syrup and beat on medium to medium-high speed for 5 to 7 minutes, just until the mixture is glossy and holds stiff peaks.

Store in an airtight container in the refrigerator for up to five days. If you chill the frosting, you may need to let it sit on the counter for 30-45 minutes before using it.

To make candy eyes, add a few drops of water and stir to make the icing a little runny. Pipe dots of icing onto waxed paper and let dry for several hours. (You can make these with stiff icing too, but you may end up with little peaks on each dot, like a chocolate chip. Just pat them down with a damp finger.)

To make the pupils, wait until the candy dots dry and then decorate them with edible markers. (You also could set aside some icing, tint it black, and pipe smaller dots onto the larger white ones — click here to see a great tutorial.)

When the candies are thoroughly dry, store them in an airtight container. (I hear they can be stored for years, but I can't speak from experience.) I keep mine right on the waxed paper. To affix the eyes, use a dot of icing or honey to make 'em stick.

TIPS & TRICKS:
  • Keep a damp cloth or plastic wrap over any open containers so the icing doesn't dry out. 
  • If you're using a piping bag, wad up a damp paper towel or wash cloth and put it in the bottom of a glass; when you're not using the bag, stash it in the glass with the tip nestled in the damp towel so it won't dry out. 
  • To create larger shapes, pipe the outline with stiff icing, then "flood" the interior with slightly thinned icing.
  • Make your own sprinkles: Pipe icing in long lines on waxed paper, let dry, then break it up to form sprinkles. You can make sprinkles in the exact color you want!

Tuesday, October 18, 2011

Monster Treats


100903_CPE_monster treats_small

100903_CPE_monster treats_1Not all Halloween treats need to involve chocolate, caramel, and candy corn. These Monster Treats are a fun way to get your vegetables. Covered in a crisp bread crumb coating, they break open to reveal brilliant purple potatoes and bright green peas. Monster guts? Monster boogers? Call 'em what you like. We call them deliciously fun.

Monster Treats

We liked the combination of bright green peas with deep purple potatoes, but you can mix in almost anything you like. You can use leftover mashed potatoes to speed up prep time.

2 pounds purple potatoes, peeled and cooked
2 teaspoons butter
salt and pepper to taste
1 to 2 cups frozen peas
2 egg whites
1 1/2 cups bread crumbs (I mix regular bread crumbs with panko)

Combine potatoes, butter, salt and pepper in a large bowl and mash with a fork or masher. Stir in peas. Refrigerate until well chilled.

Put egg whites in a shallow bowl and stir briefly with a fork or small whisk. Put bread crumbs in another shallow bowl.

To form treats, scoop up a tablespoon or so of the potato mixture and shape into a nugget or ball. Dip into egg white and then into bread crumbs.

To freeze: Arrange nuggets on a plate or pan and set in the freezer for a few hours. Store frozen nuggets in a sealed freezer bag; take them straight out of the bag to bake.

To bake in the oven (my preferred method): Preheat oven to 400 degrees. Set nuggets on a parchment-lined baking sheet and spray lightly with olive oil or cooking spray. Bake for 20 minutes or until nuggets are lightly browned and crispy.

To pan-fry: Lightly spray a non-stick pan with olive oil or cooking spray. Cook nuggets over medium heat for a few minutes on each side until lightly browned and crispy. (You can also fry them in oil.)

Monday, October 17, 2011

Pumpkin Cranberry Pudding


We're getting ready for Halloween with a slew of special treats! Over the next two weeks, we're sharing our favorite pumpkiny recipes, fun tricks to spookify a lunch box, and special dishes perfect for Halloween parties and fun dinners.

Some of them are new, and some are favorites from the 250 recipes in our archives. This is one of our favorites from seasons past: Anna's Pumpkin Pudding, an easy homemade treat decorated with an easy and vibrant fresh cranberry sauce.

As my kids drool over the bags of candy in stores (are those bags getting bigger every year?), I feel swamped by sweets. But this pudding, whose only indulgence is condensed milk, is a great way to satisfy your family's sweet tooth without caving in to this sugar-crazy season.

Pumpkin Pudding

Ideally it should be prepared one day before dinner party. But a good 6 hours in the fridge will do the trick if you are in a hurry.

Pudding
1 can organic pumpkin or 15 oz (425 g) cooked sugar pumpkin
1 14 oz. can condensed milk
2 cups Almond Milk or Soy Milk
1 tablespoon pumpkin pie spice
1 tablespoon lime or lemon zest
2 envelopes unflavored Knox gelatin

Sauce
1/2 pound fresh cranberries
2 cups apple juice

In one bowl mix condensed milk, pumpkin and spice. In a sauce pan, warm almond milk and dissolve the gelatin in it. When gelatin is dissolved and mix is warm, add it to the bowl of pumpkin and condensed milk and blend well. Pour into a plastic mold or bundt cake mold and refrigerate for at least 6 hours.

For the sauce, simmer cranberries with apple juice until smooth. Remove the chilled pudding from of the mold and spoon the sauce over it and into the well in the center.

Thursday, October 13, 2011

Cranberry Beans with Browned Garlic


I've been flirting with the idea of eating less animals and more plants for a long time. That doesn't mean that I will campaign for strictly vegetarian or vegan, but I would not feel totally okay writing about this if I omit that something changed in my lifestyle after watching Forks over Knives.

Having said that, I am now happy to tell you about my renewed love for beans. Black beans are a longtime a favorite here. Kidney beans have always been in spicy and beautiful chili con carne dishes. Even fresh string beans are always on my mind when I need to add more greens to any plate. They are all loaded with protein and fiber and lots of iron.  But nothing compares to the uniqueness of fresh cranberry beans. I found them when I went to my favorite local farmer's market, Old Mac Donald's. They caught my eye because of their bright color and curious name.


Please give it a chance even if you are not so attracted by the idea of beans. These are especially flavorful, have nutty and sweet notes and perfect texture if cooked al dente. They will lose their beautiful spots during the cooking, but will gain lots of flavor. Most kids will try it and at least will have fun opening the shells just to find the beauty of each bean, like pearls in a shell. Their season is at its end, so if you are lucky to find them in your farmer's market, here's a simple and delicious way of enjoying them.

Cranberry Beans with Garlic

4 garlic cloves
3 bay leaves
1 tablespoon extra virgin olive oil
1 pound cranberry beans, unshelled
Enough water to cover the beans
Kosher salt to taste
Oregano to taste
Zest of half a lemon


Heat oil in a heavy-bottomed pan. Add garlic and bay leaves, lower heat to medium, and brown them lightly. Add beans and sauté with the garlic for a few minutes. Add water. Cover pot and simmer for about 25 minutes or up to when the beans are soft enough, but not mushy.

Open pan and add oregano and lemon zest to finish, cooking about 5 minutes more over low heat with the pot uncovered. Serve with a drizzle of olive oil.

Tuesday, October 4, 2011

Thomcord Grape Tart


I try to avoid featuring obscure ingredients (though I know some of our favorite flavors are harder to find in areas without so many diverse markets). Today, however, I'm highlighting a variety of grape I've only found in two places: If you can find them, get your hands on some Thomcord grapes.

As a kid, I loved grape jam. Ordinary green and red grapes were such a disappointment in comparison. Eventually I found some Concord grapes at the market, but the seeds are a deal-breaker for me. Enter Thomcord grapes, a cross between Concord and Thompson. They have all the sweet, jammy flavor with none of the seeds. I shared some with friends the other day who said they're like grape candy. They're tiny, a great size for packing in lunch boxes, and they pop with flavor when you eat them. By the handful.

The Thomcord season here just started a few weeks ago. My favorite grape stand at the market offers four or five varieties, but it's the Thomcords that draw a crowd. Get your hands on some if you can! I failed to capture their beautiful purple color in the photo below: Trust me. Gorgeous.


Thomcord Grape Tart

You can substitute Concord grapes if you can't find Thomcord grapes, but you'll need to remove the seeds. Red grapes or Zante currants (champagne grapes) might work nicely, but I haven't tried it.

Crust
8 ounces gingersnap cookies (or graham crackers)
5 tablespoons butter, melted

Filling
8 ounces plain, non-fat Greek-style yogurt
8 ounces light cream cheese, at room temperature
1/4 cup sugar grated zest from 1 orange

Topping
2 pounds Thomcord grapes
2 tablespoons sugar
2 tablespoons cornstarch
2 tablespoons water

Preheat oven to 350 degrees. To prepare the crust, pulse cookies in a food processor until ground to fine crumbs. (Alternatively, you can put the cookies in a sealed, plastic bag and roll over them with a rolling pin.) Drizzle the melted butter over the crumbs and stir with a fork until well combined. Press crumbs into a pie plate and bake for 10 to 12 minutes, until crust is lightly browned. Let cool completely.

To prepare filling, In a large bowl, blend the yogurt, cream cheese, sugar, and zest until smooth. This is easiest to do with a mixer, but you can do it by hand. Pour filling evenly into cooled crust and smooth top. Cover with plastic wrap and refrigerate at least one hour.

To prepare the topping, put the grapes into a saucepan over medium heat. Cook 8-10 minutes, stirring frequently, until grapes begin to split and release their juice. In a small bowl, stir together cornstarch and water until smooth. Pour cornstarch mixture into saucepan and stir until juice thickens and becomes clear. Let cool. Spoon topping over the filling shortly before serving.

LinkWithin

Related Posts Plugin for WordPress, Blogger...