Showing posts with label In a Minute. Show all posts

Tuesday, April 29, 2014

Simple sweet potato soup for spring


This is a light, fresh soup just right for spring. You can pull it together in minutes with just two pantry basics: a sweet potato and a can of coconut milk, which adds creaminess without overwhelming the flavor.

Add a little something extra — a touch of vinegar, a stalk of lemongrass and some time, if you have it, or a few drops of hot sauce — and you have a refreshing soup that's a perfect bridge from cold-weather curries to summertime gazpacho.

I threw this together after coming home from a long holiday to a mostly-empty pantry. Spring showers called for soup, but all I had for veggies were some lettuce and a lone sweet potato.

I zapped the potato in the microwave, opened a can of light coconut milk, and pulled a stalk of lemongrass from the garden. (I know, lemongrass is hardly a pantry staple. But if you have some, use it!) Everything went into a pot for half an hour, and I stirred whenever I passed through the kitchen. A splash of vinegar and a squeeze of lemon, and it was ready to go.

The result is a little sweet without being cloying — the vinegar really elevates the taste. Adults and spice-happy kids might like it with a drop or two of Sriracha. This one is definitely going into regular rotation: Even my coconut milk-averse, sweet potato-hating husband liked this and helped himself to a second bowl. (He says it doesn't taste like sweet potato; I say it does, and he just hasn't given sweet potatoes a fair chance.)


Springtime Sweet Potato Soup

To cook a sweet potato quickly, prick it several times with a fork and set it on a plate in the microwave. Cook on high for 8-10 minutes until soft, turning once halfway through. Let cool and peel.

The vinegar and lemon/lemongrass aren't essential, but they elevate this soup from good enough to mighty tasty.

1 medium sweet potato, cooked and mashed
1 cup coconut milk
1 cup water (or broth)
1 to 3 teaspoons cider vinegar or rice wine vinegar
salt and pepper
2 stalks lemongrass, stalk only, peeled and split in half lengthwise, and/or a squeeze of lemon juice
Sriracha (optional)

Stir together mashed sweet potato, coconut milk, and water in a saucepan over medium heat. Add lemongrass stalks, if using. Warm to barely a simmer, stirring occasionally. If using lemongrass, keep on the burner for 20 to 30 minutes, then remove the lemongrass stalks.

Purée soup with an immersion blender (or blend in batches, carefully, in a blender or food processor). Stir in vinegar, a teaspoon at a time, until it has the right amount of zip to suit your taste. (If you're adding lemon juice, this is the time to do it.) Season with salt and pepper. If it's too thick, stir in a little more water, broth, or coconut  milk.

Optional:  Serve with Sriracha for those who want to add a little more heat.

Monday, December 30, 2013

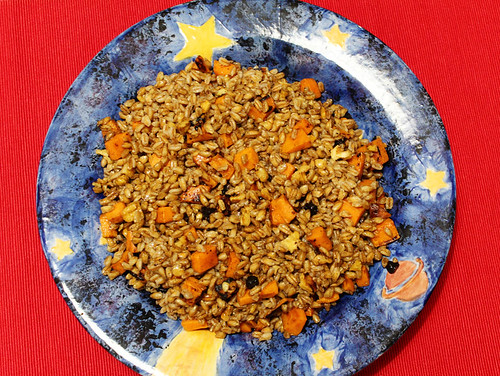
Farro with Sweet Potato and Black Garlic

131217_CPE_farro-salad_3


As the holiday break neared, Anna and I commiserated (with good humor) about how busy we were. "Eh, it's going to be a Trader Joe's week, right?"

I knew exactly what she was talking about. I had already planned for a Trader Joe's week to make the busy season a little easier. My menu plan was based on whatever good stuff TJ's had to make meal time as easy as possible.

Here's one of the dishes I made, perfect for the post-holiday detox. This grain salad makes up for the stale holiday cookies we're all still nibbling. Delicious warm or cold, it's on the sweet side — a nice bridge as I retrain my taste buds to be happy with less sugary fare. It's filling and full of good-for-you ingredients. The photograph doesn't do it justice. I'm not sure it's possible to take a good photo of farro.

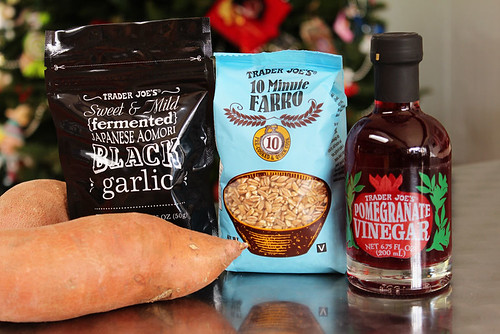
Everything in it can be found at Trader Joe's: fast-cooking farro, sweet potato, pomegranate vinegar, and — my favorite! — black garlic.

131217_CPE_farro-salad_1


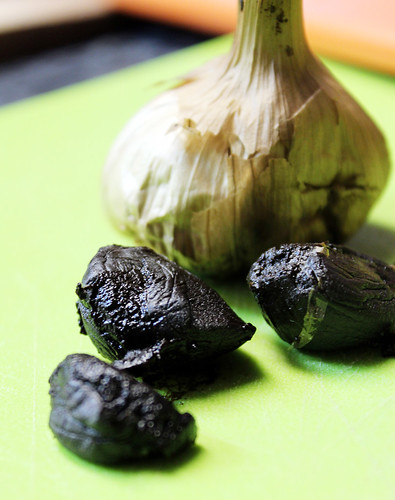
If you're unfamiliar with it, black garlic is simply fermented garlic. It's savory-sweet, garlicky without the bite. TJ's just recently started carrying black garlic, but it isn't always easy to find. I didn't see it the last time I was there and was worried they had already dropped it. The manager admitted "it's been sort of a dog for us," but they do still stock it. You can find it in specialty stores and online (including Amazon).

131217_CPE_farro salad_2


If you can't find it, no problem. Just sub some regular garlic. And if you don't have a Trader Joe's near you, of course you can find these ingredients elsewhere.

Farro with Sweet Potatoes and Black Garlic

If you can't find black garlic, you can leave it out or substitute a clove or two of minced garlic, sautéed in a bit of oil. A bit of cooked sausage also would be a tasty replacement. Farro is one of my favorite grains, but if it's out of your comfort zone swap brown rice.

1 package Trader Joe's 10-Minute Farro (or 1 1/2 cups raw farro)
1 sweet potato, diced
1/2 head of black garlic, chopped
1/2 cup toasted walnuts, chopped
olive oil

Dressing:
4 tablespoons orange juice
2 tablespoons pomegranate vinegar (or other fruity vinegar)
1 tablespoon honey
1 tablespoon olive oil
1 teaspoon Dijon mustard

Cook farro according to package directions (if you're using raw farro, cook it however you do that — I've only used TJ's!). Whisk dressing ingredients together in a bowl.

Warm a spoonful of oil in a skillet over medium heat. Add diced sweet potato and cook until soft and slightly browned.

Combine farro, sweet potato, garlic, walnuts, and dressing in a bowl. Season with salt and pepper to taste. If salad is too dry for your taste, add a splash of olive oil and stir.

Wednesday, July 31, 2013

Cucumber and Avocado Sushi Roll


 It was a midsummer dream: thanks to two Japanese arts, origami and sushi making, a whole afternoon taking care of four boys went fast paced and relatively peaceful. Maybe the secret was to keep their hands busy...

First they were all folding magazine pages to make paper boats. And after testing them on the water table, they were rolling roasted seaweed to make avocado and cucumber sushi.
The original idea was to prepare California rolls, but they were not enthusiastic about real crab. The result was simple and elegant: just rolls filled with cucumber and avocado, or just avocado.

After folding paper to make boats, it sounded as easy as it could be. Tiny hands are delicate enough to use the wood rolling mat and the wood paddle. To make the whole process fast and relaxing  I asked them to spread the rice on the roasted seaweed, as if they were painting a canvas. Then they chose what ingredients they would like to put inside the roll, and after I sealed the ends of the seaweed they helped me to roll. I put a parchment paper layer in between the mat and seaweed to make sure we wouldn't get sticky rice all over the place. It worked.


Simple Maki (Cucumber and Avocado Sushi Roll)

You could use one of Darienne's egg thin omelette inside, or just have a few ingredients available so to play with them as the children (or grownups) want. I used the Yamamotoyama brand of the roasted seaweed, easily found in grocery stores.

6 cups cal rose rice, cooked as directed or with this recipe for sushi rice
cucumber sticks
Haas avocado, sliced
soy sauce
wasabi (optional)

Most packages of roasted seaweed have instructions on how to roll a sushi roll. Stretch the cooked rice over the seaweed paper, draw a line with the fillings, moisten the seams with water using your fingertips, and roll it and slice. Once you do it right, you will do it right forever. Like folding paper or riding a bike. Enjoy!


Tuesday, June 25, 2013

Tofu and Asparagus Bowl


Having a vegan husband is a challenge. Our kids are very eager to eat protein of animal origin. They are the type to ask, "Mom, can we have steak tonight?"  I see myself as a flexitarian, eating a bit of everything doesn't harm my body or my foodie soul, although I tend to load my plate with more vegetables than anything else.

So my husband is the one who feeds my alternative creativity in the kitchen. I am happy to do that — he is a happier and healthier man since adopting some changes suggested by Forks Over Knives. And this time his dish was so beautiful that even the kids wanted to try ... and would have eaten more of they could.

They liked it so much that they asked me to post it here. For the 8-year-old, the secret of the food success was the juice of the dish. For the 6-year-old, all was good.

Tofu and Asparagus Bowl

Go for non-GMO extra-firm tofu. For this recipe I used Whole Foods 365 Brand, and the result was quite good. 

1 tablespoon extra-virgin olive oil
1 block extra-firm organic tofu, cut in 1-inch cubes
6 to 10 asparagus stems, cut diagonally
1 ripe tomato, diced
1 spring onion stem, cut diagonally
1 garlic clove, minced
1 tablespoon basil, folded and cut in strips (chiffonade)
1 tablespoon snipped chives
Kosher salt to taste

Heat olive oil in a skillet. Add tofu and increase heat to sear the cubes. Add asparagus, tomato, and spring onion. Stir-fry for 5 minutes.

Lower heat and let it sweat for about 5 minutes. Now add the minced garlic and stir. After about 4 minutes, remove from heat and add basil.

Serve over a bowl of basmati or jasmine rice. 

Wednesday, June 12, 2013

Kale Chips


My kids love kale! Yay!!! We'll... the truth is...

I mean, they love kale chips. Loaded with olive oil, garlic, and sometimes a bit of salt, those crunchy leaves are the ideal treat. My 6-year-old kindergartner loves it so much that he asked me to roast three full bags of fresh kale, planted and harvested by the students at school, to share with his friends. I was tired but enthusiastically spent 40 minutes in front of the oven on a hot night preparing their treat.

He told me that they all loved it so much. And I could believe it... See the photo below with the leftovers in the huge bowl?

I've been working with this recipe for years, and possibly every mom I've met in California has her own version. The important part is that kale is a wonderful source of nutrition and is the perfect pairing for black beans (see this classic Brazilian recipe here) and other vegetables. Or enjoy these chips on their own, as a wonderful snack.

Kale Chips

My favorite way is to make these is with green or purple kale. But dinosaur (a.k.a. Lacinato) kale works too. Make sure to get rid of the overly moist stems and leaf ribs and use just the shredded leaves. You also might want to use an olive oil sprayer.


kale leaves, washed and dried
extra-virgin olive oil, enough to spray or coat the whole batch
garlic powder
salt to taste (optional)

Preheat oven to 400 F. Line a baking sheet with aluminum foil. Spread kale leaves evenly on sheet and spray with olive oil (or drizzle olive oil over the leaves and invite little hands to mix the leaves with the oil). Sprinkle kale with garlic powder and, if using, some salt.

Roast for 5 minutes, then open the (HOT!) oven and use long tongs to turn the leaves to make sure they roast evenly. Roast for 5 more minutes and check. If the leaves aren't crunchy enough for your taste, roast just a bit longer. 

Wednesday, May 15, 2013

Versatile egg crepes, or thin omelets


1305_CPE_egg crepes_3

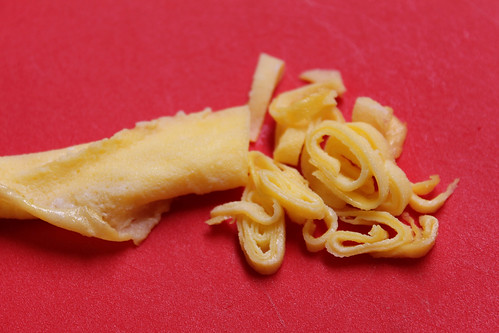
A small stash of these simple Japanese-style crepes in the fridge gives me a head start on the week. They're essentially thin, unfussy omelets with endless possibilities. My 9-year-old grabs rolled-up "egg pancakes" for a quick protein boost on busy school days. I use them to wrap salad or leftovers, instantly upgrading my lunch. They're an easy breakfast on hectic mornings. Shred them to top stir-fries or stir into rice. You can even use them to wrap sushi rolls, or cut out shapes with cookie cutters.

And just like flour-based crepes, you can go sweet or savory. Try maple syrup and perhaps a bit of mirin for sweet crepes, and enjoy plain or with a bit of fruit spread. For savory crepes, ease off on the sweet stuff and add soy sauce. They're a gluten-free, low-carb, and high-protein alternative to flour-based crepes and wraps.

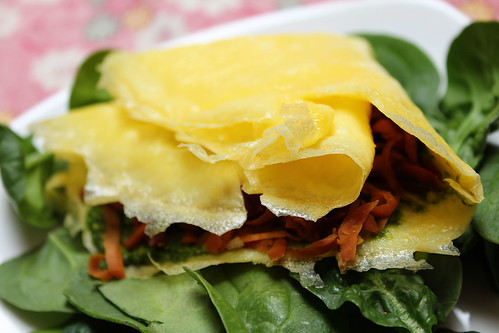
My perfect lunch is pictured at the top: an egg crepe spread with pesto and stuffed with shredded carrots (stir-fried with ginger and garlic).

Use a very nonstick skillet for these, and be sure to oil the pan between crepes. I mangle at least one every time — I use that one as a shredded crepe. The cornstarch is optional, but it helps make a more durable crepe to use as a wrap.

1305_CPE_egg crepes_1

Egg crepes

Scale this recipe up or down as you wish. This recipe should yield four or five crepes.

3 eggs
1 tablespoon sugar or maple syrup
pinch of salt
1 1/2 teaspoons of soy sauce or mirin (optional — soy sauce is good for a savory crepe, mirin for a sweeter one)
1 1/2 teaspoons cornstarch blended with 1 1/2 tablespoons water (optional — for a stronger crepe, suitable for wrapping)

In a bowl, stir together eggs, sugar, salt, and soy sauce or mirin, if using, with a fork. Don't use a whisk or egg beater — you don't want these to be frothy. Stir in cornstarch mixture, if using. Pour egg mixture through a fine sieve into a bowl.

1305_CPE_egg crepes_2Heat a small, nonstick skillet over medium-low heat. (You may need to experiment with the right temperature: Low heat works best with one of my skillets, and medium is better with the other.) Oil skillet well. Pour in just enough of the egg mixture to cover the bottom, swirling to cover bottom of pan. Cook until set, 1 to 2 to minutes, then use a spatula to loosen the sides and carefully flip over. Cook another 30 seconds or so, then remove. Continue to cook omelets, stacking them when done. Clean any burnt bits out of the pan between crepes and oil well.

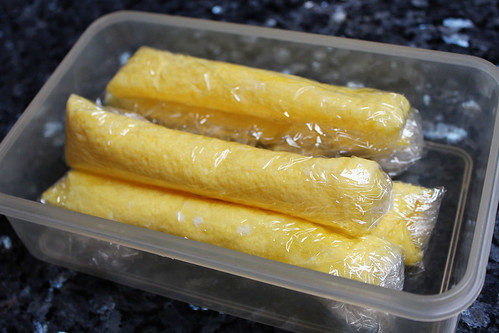
Eat plain or fill and enjoy. Or roll up each crepe in plastic wrap and refrigerate for up to five days. The crepes can also be frozen — defrost in the refrigerator.

1305_CPE_egg crepes_4


Friday, May 10, 2013

Skillet Cookies

Something to celebrate with your mom this weekend? These cookies are the perfect fit for a surprise breakfast, brunch or tea, and so easy to make. Ask your dad or older brother or sister to help you, if that's the case. If you're mom, please read this to your kid(s) for inspiration. If you are not a mom, not a child, but still want to make something different for the weekend — and are not concerned about carbs — that's a cute and delicious project.

This recipe was adapted from many griddle cookies from the web, with the added benefit that it's suitable for vegans and those who are gluten intolerant or allergic, as it was tested many times at the Cooking Club at school.

The beauty of all these is that it can be mess-free, using a freezer plastic bag (like ziplock)  to prepare, so that the dough is kneaded inside the bag, avoiding spills.

And, please, don't forget to wash and reuse the bag after, or to recycle it. It would be great to save our big mother, Earth, from more trash.


Skillet Cookies

Use a electric griddle, like we did at school, or a large skillet. 

1 cup unbleached flour (or 1 1/2 of gluten-free flour, like the one from Trader Joe's)
1/3 cup granulated sugar
1/2 teaspoon baking powder
1/2 teaspoon salt
1/2 teaspoon cinnamon ( I love Organic Saigon Cinnamon)
1/3 cup vegetable spread (I use Earth's Best, vegan)
1 tablespoon oat bran mixed with 1/3 cup soy or almond milk
1/3 cup raisins (or any other dry fruit, or none)
Vegetable oil to spray or brush on the griddle or skillet surface

Mix all dry ingredients in a gallon-size plastic bag like the ones used for freezing. Close it and shake it many times. Cut the vegetable spread into tiny cubes and add to the bag. Close the bag and squeeze it until the mix looks like crumbles. Moisten the dough with the milk and oat bran mixture until the dough forms a ball.

Roll out dough on a floured surface (you can use parchment paper to cover the surface) until it's 1/4 inch thick. Cut into shapes. Heat the skillet to medium-low heat or 320 F if using an electric griddle. Spray or brush oil on the skillet or griddle surface and carefully transfer the cookies to it. Flip them when they are golden on one side (about 3 minutes each side), and grill for another 3 minutes. Wait for cookies to cool before tasting. Enjoy!

Thursday, May 2, 2013

Toasted Coconut Ice Cream


It feels like summer in California. And coconut is again an ingredient in the spotlight for the season. I can see more and more products made from coconut in the shelves of my favorite grocery stores, and its versatility is always inviting to try different recipes.

This recipe was made many times by children at cooking club at school, and it was the most popular one during the school year. We made it after reading the funny Should I Share My Ice Cream, by Mo Willems. It's a 1-2-3 process, and can be made in an ice cream machine, popsicle maker, ice tray, or even a plastic bag!

Toasted Coconut Ice Cream 
For faster results, freeze the coconut milk for a couple of hours before mixing the ingredients. 

1 cup unsweetened shredded coconut, toasted
1 can sweetened condensed milk (for a dairy-free version, use just 1 cup of coconut milk drink with coconut palm sugar)
1 can organic coconut milk
1/2 cup coconut milk drink


Toast coconut in a baking tray for about 5 to 10 minutes at 350 F. Watch closely to avoid burning. If you're in a hurry, toast the coconut in a glass dish in the microwave for a couple of minutes until the coconut becomes golden.

Mix all ingredients. Transfer to the ice cream maker as instructed by the manual, or freeze in popsicle maker or in the freezer in ice trays. Enjoy!

Friday, March 15, 2013

St. Paddy's Potato Patties


If parsley and spring onions could be picked out of the prattie's patties, we'd probably have just awesome reviews from the mini-chefs at the school's cooking club. But to our surprise most of the children ate the patties they prepared with enthusiasm, totally forgetting their dislike for green leaves. Maybe it was just the influence of a leprechaun... or the naturally green eggs brought by mom K, who cooks with me at school and has Easter Egger chickens that lay real green-shelled eggs.

So if you'd like to celebrate St. Patrick's in easygoing style, here is the recipe. It is really easy, and with a little help using a skillet or griddle, kids may have lots of fun making them. At school they shredded parsley, used kid-safe scissors to cut the spring onion, little finger tips to peel the potatoes, forks to mash potatoes, and lots of energy to pat the potato dough and press it flat on the griddle.  

If you want to add some Irish mystique to the cooking, you can — as we did — read Jamie O'Rourke and The Big Potato, by Tomie de Paola. Irish or not, Happy St. Patrick's Day!

St Patrick's Pratties Patties

Ask the little ones to carefully pat the potatoes after you put them on the griddle, which helps the patties stay firm and cook all the way through. This recipe makes about 8 potato patties.

2 russet potatoes, baked with the skin on
1 egg
1 teaspoon garlic powder
Kosher salt to taste
2 tablespoons extra-virgin olive oil
1 tablespoon finely chopped spring onion (just the dark green part)
1 tablespoon parsley leaves (just the leaves), shredded

Preheat griddle to 350 F, or skillet to medium heat. Mash potatoes with the tip of a fork (or potato ricer) and transfer to a bowl.

Beat egg lightly and add to the potatoes, integrating the egg to the mashed potatoes. Sprinkle salt and garlic into the mix. Add parsley and spring onions, and mash a bit more to make sure that the potato mix is even.

Form little balls with a spoon, put on the griddle, and pat each one flat with the back of a wooden spoon. Grill for about three minutes on each side or until golden on both sides. 

Wednesday, March 6, 2013

Frozen whole-wheat waffles

130306_CPE_frozen waffles_2


Let's be honest: Store-bought frozen waffles pale in comparison to the real thing ... but they're still better than trying to make waffles from scratch on a busy weekday morning.

Skip the sad, wimpy waffles in the freezer cases and make your own. Cook these up on the weekend, freeze them, and heat them in the toaster whenever you want satisfying waffles that are perfectly crispy and light.

These are about as healthy as waffles can get. They're made with white whole wheat flour, which boasts all the benefits of classic whole wheat but with a milder taste and texture. I use just a bit of maple syrup for sweetener in vain hope that I can convince my boys they don't need syrup on the side. You can even leave the sweetener out completely — I have, and no one noticed.

It's a very adaptable recipe. Use ground flaxseed and non-dairy milk for vegan waffles, or stir in orange zest or blueberries for different flavor. The one below has wild blueberries baked in and is topped with leftover berry compote from this week's fruit and yogurt cups.

130306_CPE_frozen waffles_3


Frozen Whole Wheat Waffles

By all means, enjoy these freshly made! Make a double batch, eat some, and freeze the rest. Grab the waffles straight from the freezer and pop them in the toaster for quick everyday breakfasts. This makes six 4-inch square waffles.

1 1/2 cups white whole-wheat flour or all-purpose flour
2 teaspoons baking powder
1/4 teaspoon baking soda
1/4 teaspoon salt
1 teaspoon cinnamon (or other spices — I like a bit of cardamom in everything)
1 egg
1 1/2 cups milk, slightly warmed (may sub in 2 T OJ to cut taste)
2 tablespoons oil or melted butter (used Earth Balance)
2 tablespoons maple syrup

Combine dry ingredients in a large bowl. In a separate bowl, whisk together wet ingredients.

Gently combine wet and dry ingredients, being careful not to overmix, and cook according to your waffle maker's directions.

Let waffles cool slightly. Freeze in a single layer for 30 minutes, then package in a zip-top freezer bag. Take frozen waffles from bag and pop them in the toaster.

Variations

Vegan: Use soy or almond milk and canola or coconut oil. Instead of egg, stir 1 tablespoons ground flaxseed into 3 tablespoons of water and let sit a few minutes until thickened.

Extra crispy: Reduce flour by 1/4 cup and add 1/4 cup cornstarch. This is especially good if you’re enjoying some waffles right away and freezing leftovers.

Orange: Reduce milk by 2 tablespoons and add 2 tablespoons orange juice. Add grated zest from one orange to batter.

Blueberry: Add a half-cup of blueberries (tiny wild blueberries from the freezer section work nicely). To keep frozen blueberries from turning your batter purple, roll them in a bit of flour before adding to the batter.

130306_CPE_frozen waffles_1

Wednesday, February 20, 2013

Black bean hummus, two ways

130209_CPE_black-bean-hummus


I love hummus. I love it with raw veggies, I love it spread on sandwiches, I love it with chips, I love it straight off a spoon.

And I love garbanzo beans, which usually provide the creamy base for hummus. But we've been enjoying garbanzos as a meal with increasing frequency (as in this delicious slow cooker dinner, or a version of this easy warm salad for lunch), and I don't want to see them yet again at snack time. Not even puréed.

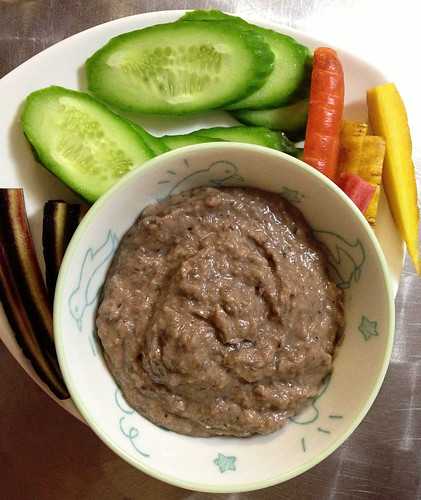
Black bean hummus, however, is a completely different dip.

After toying with a few variations, I've settled on these two favorites. The first is bright and fresh, infused with oranges. The second is bolder and spicier, and just as delicious.

I prefer my hummus without olive oil. If you find it too thick for your liking, add more water or juice, or a bit of olive oil. If you have citrus salt, use it here.

Orange Citrus Black Bean Hummus

If you have citrus salt, use it here.

1 1/2 cups cooked black beans
2 tablespoons orange juice
grated zest from 1 orange
1 tablespoon tahini
1/2 teaspoon salt
1/2 teaspoon cumin

Combine all ingredients in a food processor and blend until smooth.

Paprika-Lime Black Bean Hummus

1 1/2 cups cooked black beans
2 tablespoons reserved bean liquid
1 1/2 tablespoons lime juice
1-2 cloves garlic
1 tablespoon tahini
1/2 teaspoon salt
1/2 teaspoon cumin
1/4 teaspoon smoked paprika

Combine all ingredients in a food processor and blend until smooth. If you like it spicy, add a few drops of Sriracha.

Saturday, February 16, 2013

Snack attack


Here's something I realized recently: My two boys, who are portrayed by the youngest in this little design above, are apparently genetically programmed to be skinny. They are always complaining that there's very little time to eat their snack at school. By midmorning they are very hungry, and it looks that they need extra fuel. It's also a time when they would be rather playing than eating.

As I tried to use every opportunity to give them something healthy to eat, other than empty nutrition calories, I decided to go with the idea of packing lots of nutrition into one small snack.

And it's working. Their level of energy is increasing and I don't have to be concerned about them not eating well. By lunch time they are not so furiously hungry, and are able to enjoy some fruit and a very healthy sandwich packed with protein and vegetables.

Here are some nutrition-packed recipes and ideas I've been working with, with some success:

Little Monsters Granola Bars
Make a batch and pack them for one day of the week. Boys developed a label for them. Sweet brothers : )

Flax Seed Banana Bread
I use this recipe and I top the bread with pecans or walnuts, and sometimes homemade granola.

Reindeer Cookies
You can always add more to it. It will even hold some bananas and even more nuts or dry fruits.

Homemade Hummus
Besides what the original recipe suggest, I also add some pine nuts for extra nutrition.

Spring Pea Spread
Darienne's recipe is good-looking and it goes well with toasted whole grain bread.

Banana Bon Bons
This recipe is foolproof and kids always give ravewww.cook reviews about it when we use it to the Cooking Club.

Whole Wheat Ginger Scones
Some kids love the ginger in it. A great recipe by Darienne.


Wednesday, February 13, 2013

Sweets for your Valentine sweets

This is a busy week of holiday treats at my house! We try to acknowledge a wide range of holidays, and so far we've ushered in the Year of the Serpent on Sunday with long noodles and mandarin oranges, and Mardi Gras with a delicious king cake. My third-grader just read a book about Purim and is asking if we can try hamantaschen next week — and I still haven't decided how to mark Valentine's Day. Berry-filled meringues? Homemade truffles? Brigadeiros? Bonbons?

They sound fancy, but they're terrific choices when time — and energy — are in short supply. These sweets score big points for drama and presentation without much effort. They can be pulled together with a few ingredients you're likely to have on hand.

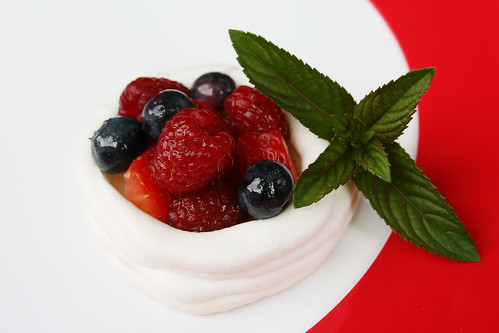
First up: Rose Meringue Clouds, lightly sweetened edible baskets filled with fruit. This version calls for rosewater, but you can substitute almost any flavor extract you like. They don't take much hands-on time, but they do spend up to two hours in the oven. If you don't have fresh berries, grab frozen fruit from the freezer.

1106_meringue


If chocolate's more your thing, go for truffles: Melt cream and chocolate together, add extra flavoring if you want, chill, and roll into truffles. We've featured lemon chamomile, lavender, and rose variations, but even plain ganache truffles are swoon-worthy. Try a dash of peppermint or orange extract for something less exotic. Invite the kids to join you as chocolatiers!

IMG_6015


Brigadeiros have been a favorite of ours since Anna introduced them to us at a birthday party. Condensed milk + chocolate = addictive little candies! These take a few minutes on the stove plus rolling them by hand. It's messy, sticky work, but someone has to do it. And then lick their fingers. Another great one for kids, but be prepared — they're likely to eat half of it in the process.


If you love chocolate and don't mind mess, enlist the kids to make Fleur de Sel Bonbons. You can manage a version of these with just a bag of chocolate chips, but you do need a candy mold. These will beat anything you might get in a heart-shaped box at the store, because the kids will have these themselves.

Tuesday, January 29, 2013

Frozen whipped cream for cocoa

121113_CPE_whipped-topping-5

One of my boys' favorite after-school treats is a mug of hot chocolate topped with whipped cream. My older son asks every single time for me to make a snowman face atop the whipped cream — with a candy corn nose and mini chocolate chips for the eyes and mouth.

But in the just-got-home bustle of artwork and notes from school and homework, gathering candy to adorn his cocoa just so is pushing dangerously into super-mom territory. I'm not that awesome, and we don't keep a stash of candy corn and mini chocolate chips around the house.

I do like to make him happy, however. And I appreciate how that smiling snowman in his cup warms his heart. So I whipped up some snowmen and stuck them in deep freeze, ready to be called into action.  Now I have a small stash of frozen snowmen and other special toppings, sprinkled with mint candies and colored sugar, ready to add a little smile to my boys' hot chocolate. Bonus:

121113_CPE_whipped-topping-3

Frozen whipped cream decorations

If you're more artful than I am, you can make whipped cream hearts and stars, whatever suits your fancy. I don't think this works with whipped cream from a can, but I haven't tried it. Whipping it up fresh is quick and easy, and so worth the minimal effort!

1 cup heavy whipping cream
1-2 tablespoons sugar
assorted toppings: chopped candies, chocolate chips, sprinkles, colored sugar, crushed candy canes

121113_CPE_whipped-topping-1


Chill a metal mixing bowl and a whisk in the freezer for 15 minutes. Pour cream into the bowl and add sugar. Whisk until the cream forms stiff peaks. You use a stand mixer as well — just chill the whisk attachment and beat on high speed.

 Line a tray or plate with waxed paper. Fill a piping bag with whipped cream and squeeze out dollops of whipped cream, or just plop the whipped cream down with a spoon. Tip: If you're making these for cocoa mugs, you might want to trace the top of the mug on the reverse side of the waxed paper to make sure you don't make these too big.

121113_CPE_whipped-topping-2

Now add candy decorations. Some, like colored sugar, may melt or sink into the whipped cream so work quickly! Slide tray into freezer and freeze until firm. (I left mine for an hour.)

Gently peel frozen dollops off tray and pack in an airtight container, lining layers with waxed paper, and freeze for up to two months.

To use, gently place a decorated dollop on top of hot chocolate and enjoy!

121113_CPE_whipped-topping-4

Sunday, January 13, 2013

Pizzwich and the Simple Changes


The idea of change is always stimulating for me, but sometimes it is just overwhelming when applied to real life. When New Year's decisions come to my mind, they might sound like just what we need. But at the end of the first month of the year they might be too drastic, heavy and just ... boring. This is always what I think about food-diet-healthier-related New Year's decisions: Oh yes, they may sound wonderful. Really?

Somehow the documentary Hungry for Change got my attention last Monday, while zapping to find something to relax me. And that's how it turned my next day upside down: I went to sleep. Far from being relaxed.

Enticed by the renewed argument about sugar-addictive foods — along with already adopted Food Rules ideas, and how we are hungry while being poorly and overly fed with over-processed foods — I shared my anxiety with my 8- and 6-year-old boys in the morning. I read the labels of their cereal at 7 a.m., and ignored the rule to think-before-you-say-something to the kids. I just plainly said:
_ That's it: We are all eating the wrong way. This is all empty food. Lots of refined sugar, syrup, etc. etc.

They were puzzled. I told them that I'd watched a documentary the night before. They wanted to watch it. I was a bit doubtful. I would not like to convert them to green juice gurus. Instead I just told them:

_ Let's just eat things that come from the garden, from nature, not from the factory.

And they listened.

But changes, to be profound, have to be made slowly and consistently. After three days running happily on fresh vegetables, fruits, grains, vegetable soups, grass-fed meat, and wild-caught fish, they were suddenly craving a classic pizza slice from one of their favorite pizza restaurants, made with very white flour and sugary tomato sauce.

I remembered someone in the movie suggesting substitute ingredients for a healthier version of it.  And that's how the boys happily prepared their own Pizz-wiches.

Pizz-wich

The success of the recipe depends on the quality of the ingredients. Look for preservative-free ingredients and no unnecessary sugar in the tomato sauce and bread. 

4 slices highly nutritious whole-wheat bread slices with less than 1g sugar per serving
4 slices partly skim vegetarian mozzarella slices (5g fat, maximum)
4 tablespoons tomato sauce (homemade or prepared with less than 1g sugar per serving)
2 teaspoons organic oregano

Cover each slice of bread with one tablespoon of red sauce. Add the slice of cheese and sprinkle oregano on top. Broil on high for 3 minutes or until the cheese melts. Enjoy!

Tuesday, January 8, 2013

Fruit-and-yogurt cups for quick, healthy breakfasts

130102_CPE_fruit yogurt_2

This first week back to school hit like a whirlwind!

After a deliciously long and lazy year-end break, it's back to routine this week. It always takes us a few days to regain our rhythm under the best of circumstances. Pile on an unusually busy few weeks ahead, toss in some curve balls, and I know I need to simplify where I can and focus on keeping our energy and spirits up.

To that end, I'm trying to keep our fridge stocked with homemade grab-and-go yogurt cups. The base is a simple fruit compote that simmers briefly while I do dishes or prep lunches. Once it's cool, I fill eight half-cup containers with fruit compote and yogurt.

I stash the cups in the fridge next to a jar of granola and a shaker filled with flaxseed meal for fresh, crunchy toppings. And that's breakfast for two for most of the school week, done in minutes. (I'd happily make enough for all four of us if the kids would eat it. They'll come around.)


This time of year, my favorite is warmly spiced Persimmon Compote, but follow the same template with fresh or frozen berries or stone fruits — this week's stash is made with frozen blueberries.

To make it, just combine chopped fruit or berries with a bit of water and a squeeze of honey in a saucepan. Bring just to gentle boil over medium heat, then reduce heat to a low simmer and cook for 10 minutes. Combine a spoonful or two of cornstarch in a small bowl with water and stir it into the cooked fruit until it thickens, then finish with a squeeze of lemon.

Once it's cool, spoon it into individual containers and top with yogurt. I like creamy non-fat Greek yogurt, with its extra protein boost.

Too much work? Swap jam or just honey for the compote.

Feeling ambitious? Make your own yogurt.

130101_CPE_fruit yogurt_1

LinkWithin

Related Posts Plugin for WordPress, Blogger...